Scale up the Panel height to increase icon size on Start bar. Move Start bar to top of screen.
Cinnamon dynamic wallpaper extension and tiling window manager extension
Use nala instead of apt-get (sudo apt-get install nala ;; sudo nala install <package>)
install ubuntu-restricted-extras
In software manager install redshift and redshit-manager to configure night light
sudo fstrim -v / #If supported, run the next two commands to optimise SSD speed and lifespan
sudo systemctl enable fstrim.timer
sudo systemctl start fstrim.timer
Enable hot corners, assign actions to moving cursor to screen corners
Enable gestures for touchpad
Enable hardware GPU rendering for web browsers:
Firefox Tweaks:
about:config
layers.acceleration.force-enabled
gfx.webrender.all
Enable GPU Rendering in Brave Browser
1. Check if hardware acceleration is already enabled:
Open the Brave browser.
Click the three-line menu (≡) at the top right and select Settings.
Scroll down and select System from the left-hand menu (or type “System” in the search bar).
Find the “Use hardware acceleration when available” setting.
Toggle it on if it’s disabled.
Restart Brave for the changes to take effect.
2. Force GPU acceleration via Brave’s flags (optional):
Brave also provides access to experimental features via “flags” similar to Chrome. Here’s how you can force GPU rendering:
In the address bar, type brave://flags and press Enter.
In the search bar, type “hardware-accelerated”.
Find the option called “Override software rendering list” and enable it.
Restart Brave for changes to apply.
3. Check GPU acceleration status:
To verify if GPU rendering is active, go to brave://gpu in the address bar.
This page will show detailed information about GPU acceleration. Look for the status of different graphical features (like “Video Decode”, “Rasterization”, and “WebGL”) to confirm that they are hardware-accelerated.
If your GPU supports it and hardware acceleration is correctly enabled, Brave will use the GPU for rendering, similar to how Firefox does it with its own hardware acceleration settings.
Did you like this? Tip cyberfella with Cryptocurrency
The Linux shell can be replaced with zsh to open up a world of extra plugins, features and themes. And it’s a pretty nice UX/UI upgrade from bash tbh.
My zsh shown below, has been complimented with oh-my-zsh and the p10k theme with customised prompt elements.
The left-side prompt elements are: battery (86%), os_icon (ElementaryOS), dir, disk_usage (8%).
The right-side prompt elements are: status (exit status 0), load (load average 1.11), time (11:02:59).
There are other prompt elements available and they are listed at the end of this post. Have fun!
Your mileage may vary between different terminals, e.g. blackbox, gnome-terminal etc. Try opening alternative terminal emulators once zsh is set up to see the differences if any, and just stick with the one that works best for you.
Installation
sudo apt-get update && sudo apt-get install zsh git

chsh -s $(which zsh)

sh -c "$(curl -fsSL https://raw.githubusercontent.com/ohmyzsh/ohmyzsh/master/tools/install.sh)"

mkdir -p ~/.local/share/fonts

cd ~/.local/share/fonts

curl -fLo "MesloLGS NF Regular.ttf" https://github.com/romkatv/powerlevel10k-media/raw/master/MesloLGS%20NF%20Regular.ttf

curl -fLo "MesloLGS NF Bold.ttf" https://github.com/romkatv/powerlevel10k-media/raw/master/MesloLGS%20NF%20Bold.ttf

curl -fLo "MesloLGS NF Italic.ttf" https://github.com/romkatv/powerlevel10k-media/raw/master/MesloLGS%20NF%20Italic.ttf

curl -fLo "MesloLGS NF Bold Italic.ttf" https://github.com/romkatv/powerlevel10k-media/raw/master/MesloLGS%20NF%20Bold%20Italic.ttf

fc-cache -fv

In your terminal of choice, replace the default font with "MesloLGS NF"
You could also try Cascadia Code Nerd Font or some of the others listed here
Install oh-my-zsh
Install oh-my-zsh to enable a framework that allows easy customisation of zsh.
sudo apt install curl wget

sh -c "$(curl -fsSL https://raw.github.com/ohmyzsh/ohmyzsh/master/tools/install.sh)"

Use the omz command to administer oh-my-zsh
After modification to the ~/.zshrc file, reload the config with,
source ~/.zshrc
When you first run the shell with the p10k theme installed, there is no config file set up, so a convenient wizard will automatically ask you some questions. More on the wizard here, but it’s fairly self-explanatory.
p10k has a number of customisable prompt elements. You will be prompted by a wizard upon first execution of the theme and it will run through various options/choices to create the .p10k.zsh config file sourced by your .zshrc file.
vi ~/.p10k.zsh and edit the left and right prompt elements contained in the following two sections.
typeset -g POWERLEVEL9K_LEFT_PROMPT_ELEMENTS=(
os_icon
dir
vcs
...
)
typeset -g POWERLEVEL9K_RIGHT_PROMPT_ELEMENTS=(
status
command_execution_time
background_jobs
...
)
After any changes,
source ~/.p10k.zsh
Add syntax-highlighting, auto-suggestion and auto-correction
git clone https://github.com/zsh-users/zsh-autosuggestions ${ZSH_CUSTOM:-~/.oh-my-zsh/custom}/plugins/zsh-autosuggestions
git clone https://github.com/zsh-users/zsh-syntax-highlighting.git ${ZSH_CUSTOM:-~/.oh-my-zsh/custom}/plugins/zsh-syntax-highlighting
Auto-correctionexemptions
If you make a mistake, zsh will offer a correction. If you have certain commands or words that are repeatedly prompted with autocorrection options, you can add them to the exemption list in ~/.oh-my-zsh/lib/correction so those words will be ignored.
Find and edit the load plugins line in ~/.zshrc
plugins=(git zsh-autosuggestions zsh-syntax-highlighting)
source ~/.zshrc
If you're happy everything works, change your default shell in /etc/passwd for your user to /usr/bin/zsh permanently. This will not affect the root user when you sudo su - to elevate your privs to change to the root user for your system.
Lastly, for vi editing to work in zsh, you'll need to add the following line to your .zshrc file in your home directory.
bindkey -v
Prompt Elements
os_icon: Operating system icon.
dir: Current directory.
vcs: Version control system (e.g., Git status).
prompt_char: Prompt character.
status: Exit status of the last command.
command_execution_time: Duration of the last command.
background_jobs: Indicator for background jobs.
history: Command history number.
time: Current time.
date: Current date.
battery: Battery status.
user: Current user.
hostname: Hostname of the machine.
ip: IP address.
load: System load.
disk_usage: Disk usage.
ram: RAM usage.
swap: Swap usage.
cpu: CPU usage.
kubecontext: Kubernetes context.
node_version: Node.js version.
python_version: Python version.
ruby_version: Ruby version.
go_version: Go version.
php_version: PHP version.
java_version: Java version.
aws: AWS profile.
azure: Azure account.
gcloud: Google Cloud account.
terraform: Terraform workspace.
nix_shell: Nix shell.
context: Context (e.g., user@hostname).
Did you like this? Tip cyberfella with Cryptocurrency
Running Kali as a daily driver is doable since it’s Debian Linux, but is it suitable or really necessary. No. Not really. You should have a dedicated laptop for running it and only run it to use the tools when ethical or approved to do so.
But there are some features in the Kali UX that you might want to see in your daily driver distro.
One of these features for me is the zsh prompt. I really like the Kali prompt but I use bash.
To make your Linux bash prompt look like the zsh one in Kali Linux, you need to customize the Bash prompt by modifying the .bashrc file in your home directory. The Kali Linux terminal prompt is typically configured to display the username, hostname, and current working directory with specific colors and formats. Here’s how you can achieve a similar look:
Open the Terminal: Open your terminal on your Linux distribution.
Edit the .bashrc File: Use a text editor to open the .bashrc file in your home directory. You can use nano, vim, or any other text editor you prefer. Here, we will use nano:
nano ~/.bashrc
Modify the PS1 Variable: Find the line that defines the PS1 variable. It might look something like this:
PS1=’${debian_chroot:+($debian_chroot)}\u@\h:\w\$ ‘ Comment it out (never delete anything!) with a hash and replace it with the following configuration to mimic the Kali Linux prompt:
Note: You can limit the number of components in the working directory path by setting the PROMPT_DIRTRIM environment variable in your ~/.bashrc file. This is worth doing if you work with exceptionally deep directory paths.
Here’s what each part of this configuration does:
[\033[01;32m]: Sets the color to green. \u: Displays the username. @: Adds the “@” character. \h: Displays the hostname. [\033[00m]: Resets the color. :: Adds a colon character. [\033[01;34m]: Sets the color to blue. \w: Displays the current working directory. [\033[00m]: Resets the color. \$ : Adds the dollar sign for normal users or a hash for the root user, followed by a space. Save the Changes: Save the changes in nano by pressing Ctrl+O, then Enter, and exit by pressing Ctrl+X.
Apply the Changes: To apply the changes you made to the .bashrc file, either close and reopen the terminal or source the .bashrc file:
source ~/.bashrc After completing these steps, your terminal prompt should look similar to the one in Kali Linux, displaying the username, hostname, and current working directory with the specified colors.
This cool little website allows you to generate custom PS1 prompts for bash that contain just the elements you want. Alternatively, just install zsh and enjoy the additional features that come with it.
Did you like this? Tip cyberfella with Cryptocurrency
To display seconds on the Raspberry Pi OS digital clock, you need to modify the clock settings on the taskbar. Here are the steps to achieve that:
Raspberry Pi OS Digital Clock Settings
Accessing the Clock Settings: a. Right-click on the clock at the top-right corner of the Raspberry Pi OS desktop. b. From the context menu, select ‘Digital Clock Settings’ or a similar option (the name might vary slightly based on the version of Raspberry Pi OS you’re using).
Adjusting Clock Format: a. In the Digital Clock Settings window, find the field named ‘Clock Format’ or ‘Format’. b. This field determines how the time is displayed. You’ll typically see some format strings like %H:%M which stands for Hour:Minute in 24-hour format. c. To add seconds, modify the string to %H:%M:%S. The %S denotes seconds. d. Once done, click ‘OK’ or ‘Apply’ to save the changes.
The digital clock on your taskbar should now display hours, minutes, and seconds.
Note: The format strings are based on the strftime function format. You can further customize the time and date format using various codes. If you’re interested, you can look up strftime format codes online for more details.
The strftime function in the C programming language provides a way to format time and date. It’s used in various systems and software, and many programming languages provide similar functionality based on the C’s strftime.
Here’s a list of common strftime codes:
%a : Abbreviated weekday name (e.g., Wed).
%A : Full weekday name (e.g., Wednesday).
%b : Abbreviated month name (e.g., Jan).
%B : Full month name (e.g., January).
%c : Locale’s appropriate date and time representation.
%C : Century (year divided by 100, range 00 to 99).
%d : Day of the month as a zero-padded decimal number (e.g., 01 to 31).
%D : Equivalent to %m/%d/%y (e.g., 04/08/21).
%e : Day of the month as a space-padded number (e.g., 1 to 31).
%F : Equivalent to %Y-%m-%d (e.g., 2021-04-08).
%H : Hour (24-hour clock) as a zero-padded decimal number (e.g., 00 to 23).
%I : Hour (12-hour clock) as a zero-padded decimal number (e.g., 01 to 12).
%j : Day of the year as a zero-padded decimal number (e.g., 001 to 366).
%m : Month as a zero-padded decimal number (e.g., 01 to 12).
%M : Minute as a zero-padded decimal number (e.g., 00 to 59).
%p : Locale’s equivalent of either AM or PM.
%r : Time in AM or PM notation (e.g., 08:08:08 PM).
%R : Equivalent to %H:%M.
%S : Second as a zero-padded decimal number (e.g., 00 to 59).
%T : Equivalent to %H:%M:%S.
%u : Weekday as a number, where Monday is 1 and Sunday is 7.
%U : Week number of the year (Sunday as the first day of the week) as a zero-padded decimal number.
%V : ISO 8601 week number of the year with Monday as the first day of the week.
%w : Weekday as a decimal number, where Sunday is 0 and Saturday is 6.
%W : Week number of the year (Monday as the first day of the week).
%x : Locale’s appropriate date representation.
%X : Locale’s appropriate time representation.
%y : Last two digits of the year (e.g., 21 for 2021).
%Y : Full year (e.g., 2021).
%z : UTC offset in the form +HHMM or -HHMM.
%% : A literal % character.
You can combine these codes in various ways to create custom date and time formats. For example, %A, %B %d, %Y would produce “Wednesday, April 08, 2021”.
Did you like this? Tip cyberfella with Cryptocurrency
Consider this a crash course in working with QR codes on Linux.
A QR code is an image that represents a URL. It can be quickly and conveniently scanned by the camera on a mobile device to open the link, rather than having to type it in manually.
Once installed, log in here to see all your tailscale connected devices.
The Umbrel app store also contains Samourai Dojo Server so you can connect your Bitcoin Samourai wallet to your own Dojo Server and perform transactions privately using Bitcoin’s CoinJoin privacy feature.
Did you like this? Tip cyberfella with Cryptocurrency
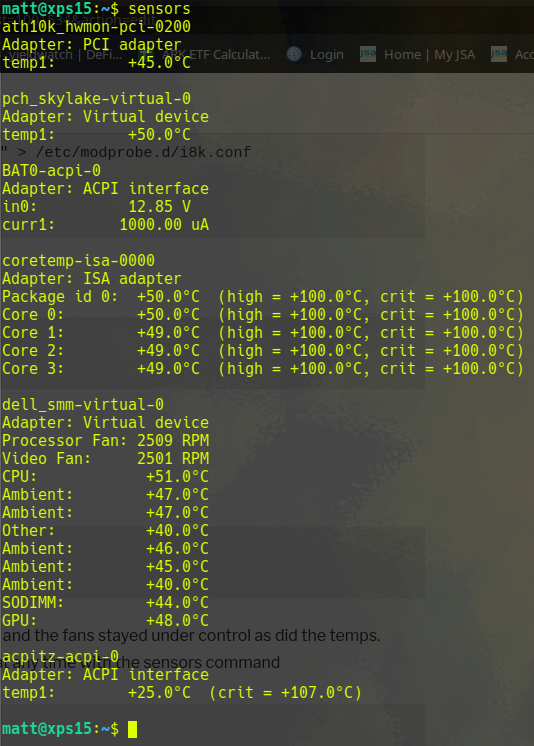
I left the config file at the defaults and the fans stayed under control as did the temps. check the temps and fan speeds at any time with the sensors command
sensors
45 – 50 degrees C and 2500 RPM fan speeds whilst running Brave and Virtual Box
Did you like this? Tip cyberfella with Cryptocurrency