Install hevc codec for .mkv video on Linux Mint

Given how complete Linux Mint is out of the box, I’m surprised to have experienced this problem even after installing all extra codecs from the repositories after initial installation.


Upon attempting to play the latest .mkv episode of Silicon Valley, I received the following error in VLC Media Player.

“unable to decode hevc, there’s nothing you can do about this error”

Or words to that effect.  I’d include a screen-shot of the error but I’ve fixed it now, so am sharing the fix with you instead.  I’ll keep it succinct.

sudo apt-add-repository ppa:strukturag/libde265

sudo apt-get update

sudo apt-get install gstreamer0.10-libde265

sudo apt-get install gstreamer1.0-libde265

sudo apt-get install vlc-plugin-libde265

Did you like this?
Tip cyberfella with Cryptocurrency

Donate Bitcoin to cyberfella

Scan to Donate Bitcoin to cyberfella
Scan the QR code or copy the address below into your wallet to send some bitcoin:

Donate Bitcoin Cash to cyberfella

Scan to Donate Bitcoin Cash to cyberfella
Scan the QR code or copy the address below into your wallet to send bitcoin:

Donate Ethereum to cyberfella

Scan to Donate Ethereum to cyberfella
Scan the QR code or copy the address below into your wallet to send some Ether:

Donate Litecoin to cyberfella

Scan to Donate Litecoin to cyberfella
Scan the QR code or copy the address below into your wallet to send some Litecoin:

Donate Monero to cyberfella

Scan to Donate Monero to cyberfella
Scan the QR code or copy the address below into your wallet to send some Monero:

Donate ZCash to cyberfella

Scan to Donate ZCash to cyberfella
Scan the QR code or copy the address below into your wallet to send some ZCash:

Adding a blocklist to Transmission torrent client on Linux

When using a torrent client on Windows such as utorrent, it’s not a bad idea to run peer block to protect your computer from inbound connections from a maintained list of known ip addresses.


Linux comes with a torrent client built in, usually Transmission, although Deluge is a bit more like utorrent, i.e. shows more info on the screen, has a few more options etc.  Transmission works perfectly well though and ticks the minimalist box if that’s your thing.  Both are available via the repositories using the built in package manager.

Peer Block isnt available for Linux.  Transmission however, supports the use of blocklists, so increasing your level of protection has actually never been simpler.

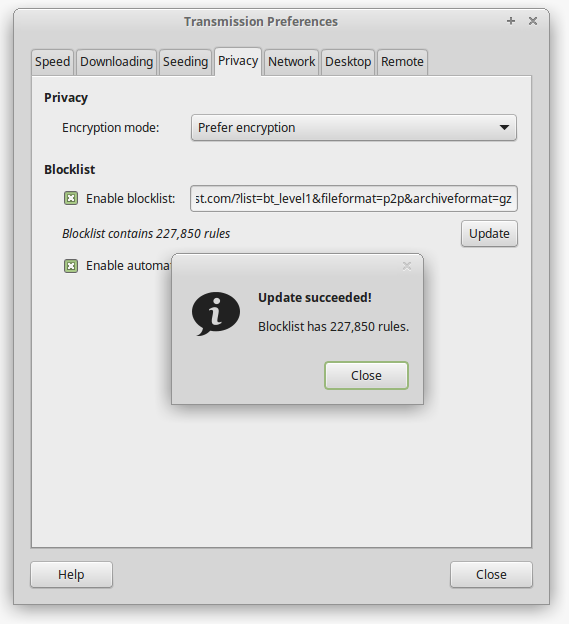
In Preferences, just add the following url to the Blocklist field and click Update.  Done.

http://list.iblocklist.com/?list=bt_level1&fileformat=p2p&archiveformat=gz

transmission

To provide system-wide protection, you should install ufw from the package manager.

  gufw is a GUI that can be used to enable ufw and configure rules.

ufw is installed by default in Linux Mint but is not turned on.

firewall

Did you like this?
Tip cyberfella with Cryptocurrency

Donate Bitcoin to cyberfella

Scan to Donate Bitcoin to cyberfella
Scan the QR code or copy the address below into your wallet to send some bitcoin:

Donate Bitcoin Cash to cyberfella

Scan to Donate Bitcoin Cash to cyberfella
Scan the QR code or copy the address below into your wallet to send bitcoin:

Donate Ethereum to cyberfella

Scan to Donate Ethereum to cyberfella
Scan the QR code or copy the address below into your wallet to send some Ether:

Donate Litecoin to cyberfella

Scan to Donate Litecoin to cyberfella
Scan the QR code or copy the address below into your wallet to send some Litecoin:

Donate Monero to cyberfella

Scan to Donate Monero to cyberfella
Scan the QR code or copy the address below into your wallet to send some Monero:

Donate ZCash to cyberfella

Scan to Donate ZCash to cyberfella
Scan the QR code or copy the address below into your wallet to send some ZCash:

Deleting Windows data where the path length exceeds 260 characters

After migrating Windows data, it can be a royal pain cleaning up the source data using del *.* /s /q /f, especially when the path length exceeds 260 (or thereabouts) characters.  You can manually shorten the folder names and keep trying, but this may be time consuming, tiring and ultimately futile.

The simplest way I’ve found to reliably delete data, irrespective of path length, is to use robocopy.

  1. cd into the directory that you want to empty
  2. create a new empty subdirectory called empty
  3. rename all other adjacent folders 1, 2, 3, 4 etc if possible
  4. robocopy empty 1 /mir /r:1 /w:1
  5. repeat for each adjacent folder, 2, 3, 4 etc.


Did you like this?
Tip cyberfella with Cryptocurrency

Donate Bitcoin to cyberfella

Scan to Donate Bitcoin to cyberfella
Scan the QR code or copy the address below into your wallet to send some bitcoin:

Donate Bitcoin Cash to cyberfella

Scan to Donate Bitcoin Cash to cyberfella
Scan the QR code or copy the address below into your wallet to send bitcoin:

Donate Ethereum to cyberfella

Scan to Donate Ethereum to cyberfella
Scan the QR code or copy the address below into your wallet to send some Ether:

Donate Litecoin to cyberfella

Scan to Donate Litecoin to cyberfella
Scan the QR code or copy the address below into your wallet to send some Litecoin:

Donate Monero to cyberfella

Scan to Donate Monero to cyberfella
Scan the QR code or copy the address below into your wallet to send some Monero:

Donate ZCash to cyberfella

Scan to Donate ZCash to cyberfella
Scan the QR code or copy the address below into your wallet to send some ZCash:

Dell BIOS updates w/o Windows

If like me, you have a Dell laptop running linux and you want to bring your firmware up to date, you’ll realise that the executables downloadable from Dell’s support site require Windows OS to run.  Or do they?  The good new is No.  They don’t.

OK, so they won’t run on Linux either, but they will run from a FreeDOS command line.

Long story short,  download SystemRescueCD

Create a bootable USB Stick using THESE instructions…

mkdir -p /tmp/cdrom

sudo mount -o loop,exec ~/Downloads/systemrescuecd-x86-4.5.4.iso         #your version maybe newer!

plug in the usb stick      #be prepared to loose everything on it!

cd /tmp/cdrom

sudo bash ./usb_inst.sh

Create a folder on the USB stick called Dell for example, and copy the BIOS update for your computer into it.

Boot the computer with the USB stick and choose the FreeDOS option (it can be found in one of the menus), otherwise it’ll boot into the default linux command line environment, and you don’t want that for this.

At the FreeDOS command prompt A:> change to C:> and type dir to view the files on the USB stick.

You should see the Dell directory you created.  cd into the Dell directory and run the executable BIOS upgrade program.

Reboot into your Linux OS.  The following commands show the firmware level and other info for your computer.

You may need to install libsmbios first

sudo apt-get install libsmbios-bin

dell-fw-commands


Did you like this?
Tip cyberfella with Cryptocurrency

Donate Bitcoin to cyberfella

Scan to Donate Bitcoin to cyberfella
Scan the QR code or copy the address below into your wallet to send some bitcoin:

Donate Bitcoin Cash to cyberfella

Scan to Donate Bitcoin Cash to cyberfella
Scan the QR code or copy the address below into your wallet to send bitcoin:

Donate Ethereum to cyberfella

Scan to Donate Ethereum to cyberfella
Scan the QR code or copy the address below into your wallet to send some Ether:

Donate Litecoin to cyberfella

Scan to Donate Litecoin to cyberfella
Scan the QR code or copy the address below into your wallet to send some Litecoin:

Donate Monero to cyberfella

Scan to Donate Monero to cyberfella
Scan the QR code or copy the address below into your wallet to send some Monero:

Donate ZCash to cyberfella

Scan to Donate ZCash to cyberfella
Scan the QR code or copy the address below into your wallet to send some ZCash:

Installing Dropbox on ElementaryOS (Freya)

ElementaryOS is the closest thing to Mac OS-X in terms of consistency and minimalism of it’s desktop environment interface.  Unlike other Linux distro’s it’s released when the developers think it’s ready, rather than a 6 month rolling cycle.  It’ll take a lot to turn my head away from Linux Mint but Elementary has got a lot of things going for it to be quite honest and I’ll leave you to discover them yourself.  I’m only interested in problems, and the first one I ran into was installing Dropbox.  Installing it from the Software Centre doesn’t work.


They way to sort it, is to install git using sudo apt-get install git

Once git is installed, then run the following commands

git clone https://github.com/zant95/elementary-dropbox /tmp/elementary-dropbox
bash /tmp/elementary-dropbox/install.sh

dropbox-inst-elementary

Dropbox will then open, asking for your account username and password, and the Dropbox sync icon will appear in WingPanel.

References:

https://github.com/zant95/elementary-dropbox

Did you like this?
Tip cyberfella with Cryptocurrency

Donate Bitcoin to cyberfella

Scan to Donate Bitcoin to cyberfella
Scan the QR code or copy the address below into your wallet to send some bitcoin:

Donate Bitcoin Cash to cyberfella

Scan to Donate Bitcoin Cash to cyberfella
Scan the QR code or copy the address below into your wallet to send bitcoin:

Donate Ethereum to cyberfella

Scan to Donate Ethereum to cyberfella
Scan the QR code or copy the address below into your wallet to send some Ether:

Donate Litecoin to cyberfella

Scan to Donate Litecoin to cyberfella
Scan the QR code or copy the address below into your wallet to send some Litecoin:

Donate Monero to cyberfella

Scan to Donate Monero to cyberfella
Scan the QR code or copy the address below into your wallet to send some Monero:

Donate ZCash to cyberfella

Scan to Donate ZCash to cyberfella
Scan the QR code or copy the address below into your wallet to send some ZCash:

Using Linux commands on WIndows

Wouldn’t it be nice if you could pipe the output from windows commands into non-windows commands like grep, cut, awk, sort etc that are available to you on alternative unix-based operating systems?


Download and install GNUWin32 from here and the CoreUtils package here and Grep here that should do it.  There are more packages available though here

Once installed, add the path to the bin directory to your Windows System Environment Variable Path

Environment_variables Path

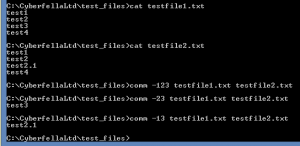
A few useful commands will now be available on the command line.  My favourite is comm which compares files and can be quite flexible with the output with the -1 -2 or -3 switches to suppress lines that appear in file1, file2 or both files respectively.   You can also combine them e.g. -12 -23, 13 to affect the output, so that only the desired output is achieved.  This takes a bit of playing around with, but is very powerful and very simple.  So much so, that it is my number 1 go to tool for file comparison.  Examples shown the in the screenshots below.

comm-helpcomm-3 comm_windows

Note:  Some Windows tools such as icacls export text to a format other than ANSI.  When viewed using Notepad or Notepad++, all appears fine, but if you cat them , you’ll see there are effectively spaces between each character, meaning grep won’t work.  Such text files will need to be saved in ANSI format first.  You can do this using Notepad++.  After selecting Encode in ANSI, save it, then retry grep for a more successful pattern match!

ANSI


Did you like this?
Tip cyberfella with Cryptocurrency

Donate Bitcoin to cyberfella

Scan to Donate Bitcoin to cyberfella
Scan the QR code or copy the address below into your wallet to send some bitcoin:

Donate Bitcoin Cash to cyberfella

Scan to Donate Bitcoin Cash to cyberfella
Scan the QR code or copy the address below into your wallet to send bitcoin:

Donate Ethereum to cyberfella

Scan to Donate Ethereum to cyberfella
Scan the QR code or copy the address below into your wallet to send some Ether:

Donate Litecoin to cyberfella

Scan to Donate Litecoin to cyberfella
Scan the QR code or copy the address below into your wallet to send some Litecoin:

Donate Monero to cyberfella

Scan to Donate Monero to cyberfella
Scan the QR code or copy the address below into your wallet to send some Monero:

Donate ZCash to cyberfella

Scan to Donate ZCash to cyberfella
Scan the QR code or copy the address below into your wallet to send some ZCash:

Comparing text files using Notepad++

Notepad++ is my favourite text editor for Windows.  It’s great, it’s free and you should use it.  I’ll leave you to discover it’s cool little features, including themes under Style Configurator.  My favourite theme is khaki for its ease on the eyes when trawling through logs.  black on white gets pretty tiresome.  Syntax colour highlighting according to your coding language is a nice touch too, for spotting those elusive typos tripping up your code.

http://notepad-plus-plus.org/download/v6.7.5.html

It used to include a plugin called Compare, that you could use to compare different files and highlight their differences, but this was removed due to compatibility issues.  Hopefully it’ll return.  In the meantime, it is possible to download the plugin separately, and copy it to the plugins folder under Program Files (x86)\Notepad++\plugins

http://sourceforge.net/projects/npp-compare/?source=typ_redirect

Expand the zip file and copy the .dll into place…

Compare-plugin

Restart Notepad++ (it conveniently opens whatever files were open before it was closed – another nice feature).  The plugins menu now has the Compare plugin…

notepad_compare

Files are compared and differences highlighted…

notepad_compare2

There is also a convenient navigation pane on the right hand side (not shown) that shows all the red and green areas (mismatches and differences) in the files.

Enjoy the best free text editor and file comparison functionality all in the same app and ask yourself why in 2015 Microsoft’s own Notepad bundled with Windows still doesn’t have any of these essential features built in.

Did you like this?
Tip cyberfella with Cryptocurrency

Donate Bitcoin to cyberfella

Scan to Donate Bitcoin to cyberfella
Scan the QR code or copy the address below into your wallet to send some bitcoin:

Donate Bitcoin Cash to cyberfella

Scan to Donate Bitcoin Cash to cyberfella
Scan the QR code or copy the address below into your wallet to send bitcoin:

Donate Ethereum to cyberfella

Scan to Donate Ethereum to cyberfella
Scan the QR code or copy the address below into your wallet to send some Ether:

Donate Litecoin to cyberfella

Scan to Donate Litecoin to cyberfella
Scan the QR code or copy the address below into your wallet to send some Litecoin:

Donate Monero to cyberfella

Scan to Donate Monero to cyberfella
Scan the QR code or copy the address below into your wallet to send some Monero:

Donate ZCash to cyberfella

Scan to Donate ZCash to cyberfella
Scan the QR code or copy the address below into your wallet to send some ZCash:

Excel Password Breaker

For my 100th post on my blog here at cyberfella.co.uk I shall tell you how to recover the passwords used to protect the cells, worksheets and workbooks in Microsoft Excel.  Unlike every other post on my blog, I cannot claim that the vbscript used in the macro editor shown below is my own work.  If I knew the original author I’d gladly credit them, so let me know via the comments if you know who came up with this little gem and once I’ve verified that they are indeed the original author, then due credit will be awarded here!

So, you’re working to a deadline which is fast approaching and you’ve attempted to change the contents of a cell, and received the highly annoying message…

The cell or chart that you are trying to change is protected and therefore read-only

protected


Subsequent attempts at unprotecting the spreadsheet results in you being prompted for a password that you have no idea of and neither does anyone else.

No problem.   You’re still gonna make that deadline.

Hit Alt F11 to open the Macro Editor, double click the sheet giving you a problem and paste the following vbscript code into the empty code pane.  

Note below that the tabs in your spreadsheet may not actually appear in the order that they were originally created in, so be sure you click the correct sheet/tab name.

click-sheet


WordPress is frankly terrible at formatting code in posts whether they be in quotes or not and syntax can be easily messed up resulting in code that then doesn’t work.

Click on the link below to go to a separate html page where the code will be properly formatted for you to cut and paste into your macro – and is guaranteed to work.

excel-password-breaker-macro


excel-password-breaker

Now run the macro by clicking on the “Play” button on the toolbar (shown below).

macro

There may be a delay of up to a minute or more but the likelihood is that within a few seconds a message box will appear and you’ll be presented with the password.  Make a note of it if you like, but in practice the cells in my spreadsheet were also automatically unlocked.


Did you like this?
Tip cyberfella with Cryptocurrency

Donate Bitcoin to cyberfella

Scan to Donate Bitcoin to cyberfella
Scan the QR code or copy the address below into your wallet to send some bitcoin:

Donate Bitcoin Cash to cyberfella

Scan to Donate Bitcoin Cash to cyberfella
Scan the QR code or copy the address below into your wallet to send bitcoin:

Donate Ethereum to cyberfella

Scan to Donate Ethereum to cyberfella
Scan the QR code or copy the address below into your wallet to send some Ether:

Donate Litecoin to cyberfella

Scan to Donate Litecoin to cyberfella
Scan the QR code or copy the address below into your wallet to send some Litecoin:

Donate Monero to cyberfella

Scan to Donate Monero to cyberfella
Scan the QR code or copy the address below into your wallet to send some Monero:

Donate ZCash to cyberfella

Scan to Donate ZCash to cyberfella
Scan the QR code or copy the address below into your wallet to send some ZCash:

Administrative users in Ubuntu

When you install Ubuntu Linux or one of its derivatives (Xubuntu, Kubuntu, Lubuntu), the first user you add to the system during installation will automatically be made an Administrative user.  This is necessary so that the user can configure the system.  Like most UNIX based operating systems, any privileged operation requires the user to elevate their system privileges via the sudoers mechanism.

Rather than logging in as an administrative user using a password that can be intercepted, the sudoers mechanism prompts the non-privileged user for their own password which authenticates that user as being genuine before looking in the /etc/sudoers file to verify whether or not that user is permitted to elevate their privileges to that of root status.

The sudoers file can be edited using the visudo command and more granular privileges assigned to groups of sudo users to provide more control over precisely what commands a non-privileged user is permitted to run.  For the most part though, the default sudoers file simply permits any users in the systems sudo group in /etc/group to run any command by simply preceding that command with sudo.

For example, installing additional software on the system is in itself, a privileged operation, so to install say the vlc media player, one would need to type sudo apt-get install vlc.  Typing apt-get install vlc by any user other that root will not work.  A non-privileged user can change to the root user without knowing the root users password by using the sudo su – command and entering their own password – provided they are a member of the sudo group on the system.  In fact it is entirely unnecessary and more common than not to not know the root users actual password, even if you installed the operating system yourself!

So thats how Linux protects itself, explained in files and command line terms, but most desktop Linux users don’t use the command line, preferring to turn to the convenient GUI’s provided by the Settings Manager, which brings me to the point of this post.

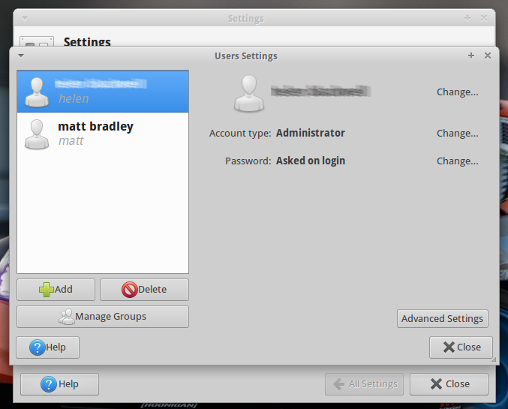
If you make additional users on your Ubuntu desktop system an “Administrator” so that they can install software, connect to networks, wifi and printers etc, then you may expect them to be able to actually do all those things once you change them to “Admnistrator” status.  I would.  But we’d be wrong.  In all honesty, I don’t know what purpose that GUI actually serves other than being able to easily add more users without mastering the adduser or useradd command.
xfce-administrators


Any extra users don’t get added to the systems sudo group – the very thing they need to be members of in order to do anything administrative?!

So you’ll need to add them manually by using sudo vi /etc/group and appending a comma followed by their username to the line beginning with sudo in /etc/group

Assuming you’re not familiar with vi, you can make life easier by using sudo gedit /etc/group or sudo mousepad /etc/group commands instead.

xubuntu-sudoers

Did you like this?
Tip cyberfella with Cryptocurrency

Donate Bitcoin to cyberfella

Scan to Donate Bitcoin to cyberfella
Scan the QR code or copy the address below into your wallet to send some bitcoin:

Donate Bitcoin Cash to cyberfella

Scan to Donate Bitcoin Cash to cyberfella
Scan the QR code or copy the address below into your wallet to send bitcoin:

Donate Ethereum to cyberfella

Scan to Donate Ethereum to cyberfella
Scan the QR code or copy the address below into your wallet to send some Ether:

Donate Litecoin to cyberfella

Scan to Donate Litecoin to cyberfella
Scan the QR code or copy the address below into your wallet to send some Litecoin:

Donate Monero to cyberfella

Scan to Donate Monero to cyberfella
Scan the QR code or copy the address below into your wallet to send some Monero:

Donate ZCash to cyberfella
Scan to Donate ZCash to cyberfella
Scan the QR code or copy the address below into your wallet to send some ZCash:

Printing PDF’s in Ubuntu/Xubuntu/Mint

Nobody likes that sinking feeling when your favourite OS lets you down, but the truth of the matter is Linux, Printing and PDF’s don’t get on.  A vanilla install of Linux Mint on a Dell XPS laptop and Xubuntu on a hp desktop confirms that out of the box you could well find yourself having problems printing – especially PDF’s.  What really annoys me is that I specifically bought an hp Laserjet printer for it’s simplicity and supposed compatibility with Ubuntu (albeit via the hplip – HP Linux Printing Libraries package conveniently available in the Ubuntu Repositories).

hplip on it’s own isn’t enough though.  You’ll get your test page out but thats about it.  Anything else is a lottery and with PDF’s you’re out of luck.  This frustration will be accentuated by the reasons for printing a PDF in the first place – in this day and age of electronic communication, its usually a rare requirement in order to sign a form prior to scanning it and sending it back to someone.  Yep, printing pdf’s is usually for something really important and thats exactly when “favourite OS” will let you down.  Grr.

So, this is how to sort it (if you find yourself having problems).

sudo apt-get install hplip hplip-gui

sudo apt-get install cups-pdf

sudo hp-plugin

hp-plugin


Note that the cups-pdf package isn’t actually for printing PDF’s via CUPS (Common Unix Printing System) as such.  It’s actually for printing a file to a PDF (as opposed to paper).  Irrespective of this, I can assure you that printing PDF’s (PDF files to paper) did not work until this package was installed.  Being able to print to a PDF file instead of paper is also a great feature to add to your linux desktop.  It should be installed as part of the base install.  Folks shouldn’t be expected to figure this stuff out.  It’s the sort of non-functionality that drives people away from Linux, sadly sending them running back to Windows with their tails between their legs.

hp-plugin provides a convenient GUI to download a mysterious binary package from HP that once installed, everything works beautifully.

Be aware of this apparent bug in Xubuntu though http://www.cyberfella.co.uk/2014/05/02/ubuntu-admin-users/ whereby any users other than the first user cannot run sudo hp-plugin to fix their own printing woes, even if they appear to be an admin user according to the Settings Manager, Users and Groups utility.

Did you like this?
Tip cyberfella with Cryptocurrency

Donate Bitcoin to cyberfella

Scan to Donate Bitcoin to cyberfella
Scan the QR code or copy the address below into your wallet to send some bitcoin:

Donate Bitcoin Cash to cyberfella

Scan to Donate Bitcoin Cash to cyberfella
Scan the QR code or copy the address below into your wallet to send bitcoin:

Donate Ethereum to cyberfella

Scan to Donate Ethereum to cyberfella
Scan the QR code or copy the address below into your wallet to send some Ether:

Donate Litecoin to cyberfella

Scan to Donate Litecoin to cyberfella
Scan the QR code or copy the address below into your wallet to send some Litecoin:

Donate Monero to cyberfella

Scan to Donate Monero to cyberfella
Scan the QR code or copy the address below into your wallet to send some Monero:

Donate ZCash to cyberfella

Scan to Donate ZCash to cyberfella
Scan the QR code or copy the address below into your wallet to send some ZCash: