Low Colour Depth running Xubuntu on HP D530 SFF PC

I prefer to buy old hardware, fix it up a little, install and tune my preferred Linux desktop OS (can’t help but keep coming back to Xubuntu), then run my desktop PC’s into the ground.  Even when I do finally replace them, it’s usually with something I picked up from ebay for under £100.  I don’t send the old ones to the dumpster though.  They get a fresh rebuild and are gifted to the parents, who despite their unhealthy obsession with purchasing technology (a trait they didn’t inherit from me), love the rapid performance, simple looks, and “it just works” nature of Xubuntu.  Despite consulting in I.T. and knowing far more than any mortal should have to know just to get my stuff working well, I find as I get older and busier, I get less and less tolerant to tech that doesn’t work.  Especially when I’ve paid good money for it.  Luckily Xubuntu is free, so when I hit a snag, I am a little more tolerant and the open source community always provides some quick, convenient, command line solution.

Since Apple is proprietary hardware and software, consumers would be right to expect it to work perfectly.  Most hardware is made with Windows PC’s in mind so once the drivers are installed, consumers would be right to expect a half way decent level of performance too.  Many people are quick to blame Linux when something doesn’t quite work properly, but I never see Linux itself being the root cause of the problem.  It’s either the Broadcom wireless chipset that’s the problem, as it’s been blacklisted by the kernel due to its lack of security (something that can still be reversed), or in this case the embedded Intel video chipset in my old, trusty HP D530 SFF PC that defaults to 16 bit colour.

Rather than throw £15 away on an AGP graphics card to go in it, the open source community once again comes to the rescue with a simple and effective “hack” to force the Default Screen to use 24 bit colour.

low-color-depth


As root, create a file /usr/share/X11/xorg.conf.d/00-xorg.conf that contains the following lines…

Section “Screen”

    Identifier “Default Screen”

    DefaultDepth 24

EndSection

Then reboot.  After logon you’ll notice the wallpaper is not so blocky.  £15 saved.  Parents happy.

Did you like this?
Tip cyberfella with Cryptocurrency

Donate Bitcoin to cyberfella

Scan to Donate Bitcoin to cyberfella
Scan the QR code or copy the address below into your wallet to send some bitcoin:

Donate Bitcoin Cash to cyberfella

Scan to Donate Bitcoin Cash to cyberfella
Scan the QR code or copy the address below into your wallet to send bitcoin:

Donate Ethereum to cyberfella

Scan to Donate Ethereum to cyberfella
Scan the QR code or copy the address below into your wallet to send some Ether:

Donate Litecoin to cyberfella

Scan to Donate Litecoin to cyberfella
Scan the QR code or copy the address below into your wallet to send some Litecoin:

Donate Monero to cyberfella

Scan to Donate Monero to cyberfella
Scan the QR code or copy the address below into your wallet to send some Monero:

Donate ZCash to cyberfella

Scan to Donate ZCash to cyberfella
Scan the QR code or copy the address below into your wallet to send some ZCash:

Using Ubuntu One on Linux Mint

If you want to use one of Linux Mint’s various distributions (XFCE would be my choice), but feel locked into Ubuntu due to it’s free 5GB of Ubuntu One cloud storage, you can install Ubuntu One client on Linux Mint too, taking advantage of both.

sudo add-apt-repository ppa:noobslab/apps
sudo apt-get update
sudo apt-get install ubuntuone-client ubuntuone-control-panel ubuntuone-client-proxy ubuntuone-control-panel-qt

Finally, just configure Ubuntu One client with your account username and password just as you would in Ubuntu/Kubuntu/Xubuntu/Lubuntu/Ubuntu Studio..

Did you like this?
Tip cyberfella with Cryptocurrency

Donate Bitcoin to cyberfella

Scan to Donate Bitcoin to cyberfella
Scan the QR code or copy the address below into your wallet to send some bitcoin:

Donate Bitcoin Cash to cyberfella

Scan to Donate Bitcoin Cash to cyberfella
Scan the QR code or copy the address below into your wallet to send bitcoin:

Donate Ethereum to cyberfella

Scan to Donate Ethereum to cyberfella
Scan the QR code or copy the address below into your wallet to send some Ether:

Donate Litecoin to cyberfella

Scan to Donate Litecoin to cyberfella
Scan the QR code or copy the address below into your wallet to send some Litecoin:

Donate Monero to cyberfella

Scan to Donate Monero to cyberfella
Scan the QR code or copy the address below into your wallet to send some Monero:

Donate ZCash to cyberfella

Scan to Donate ZCash to cyberfella
Scan the QR code or copy the address below into your wallet to send some ZCash:

Ubuntu 13.04 Nvidia driver fix

Ubuntu 13.04 is here and is being hailed as the best Ubuntu yet.

Being an advocate I wish I could agree, however this release is the first one in years that hasn’t “just worked” for me.

If that isn’t disappointing enough, the reason it doesn’t work are, in my opinion downright unforgiveable – The Nvidia driver has been replaced with the open-source equivalent effort, namely Nouveau.  I think I spelled that right. If not Google will conveniently correct me anyway when I go searching for ways to fix my new screen resolution of 640×480 pixels.

Forcing this upon people when the performance comparison are as follows (see below) is just plain stooopid.  Especially as you’ve already spent money on the nvidia card in the first place – why get all “open source” about driving it when nvidia provides the drivers for free?  Duhhhh.  It doesn’t help push the use of Steam either (the PC gaming platform for Linux) when the resultant performance is half what it could be.  Whilst I admire the open source communitys desire to do-it-yourself, the rest of the world ain’t that bovvered.

nouveau-vs-nvidia


A pet hate of mine is when people make a fantastic effort to post a solution to a problem using the GUI instead of the command line.  So if you use the most unpopular Ubuntu desktop of all time (Unity) then you’re in luck, but if you use one of the other desktops, then you’re out of luck.

Hopefully those of you using Ubuntu Studio like you should, will find this and correct your nvidia issues by installing the proprietary drivers using the command prompt.

sudo apt-add-repository ppa:xorg-edgers/ppa -y; sudo apt-get update; sudo apt-get upgrade -y; sudo apt-get install nvidia-316 nvidia-settings-316 -y


Did you like this?
Tip cyberfella with Cryptocurrency

Donate Bitcoin to cyberfella

Scan to Donate Bitcoin to cyberfella
Scan the QR code or copy the address below into your wallet to send some bitcoin:

Donate Bitcoin Cash to cyberfella

Scan to Donate Bitcoin Cash to cyberfella
Scan the QR code or copy the address below into your wallet to send bitcoin:

Donate Ethereum to cyberfella

Scan to Donate Ethereum to cyberfella
Scan the QR code or copy the address below into your wallet to send some Ether:

Donate Litecoin to cyberfella

Scan to Donate Litecoin to cyberfella
Scan the QR code or copy the address below into your wallet to send some Litecoin:

Donate Monero to cyberfella

Scan to Donate Monero to cyberfella
Scan the QR code or copy the address below into your wallet to send some Monero:

Donate ZCash to cyberfella

Scan to Donate ZCash to cyberfella
Scan the QR code or copy the address below into your wallet to send some ZCash:

Installing Cinelerra on Ubuntu Studio

Cinelerra is the best video editor available for Linux, so as a creative user of Ubuntu Studio (and one who never gets tired of free stuff), I thought I’d take the time to quickly blog on how to install Cinelerra on Ubuntu Studio.  It’s not available in the repositories (do what?) so you have to manually add the repository containing the packages for Ubuntu 12.10 and thus Ubuntu Studio 12.10

Pre-requisities

None that I’m aware of, but as a matter of routine, I always install the medibuntu repository for improved media functionality on Ubuntu.  Googling medibuntu will get you to those instructions, or for the lazy, they are…

http://www.medibuntu.org/repository.php

Set up shmmax kernel parameter...

sudo su -
sudo bash -c 'echo 0x7fffffff > /proc/sys/kernel/shmmax'
exit

Set an environment variable to allow Cinelerra to know where the audio stuff is...

export LADSPA_PATH=/usr/lib/ladspa
Installing Cinelerra

Add the repository (make sure any other package management software is shut, 
i.e. no synaptic package manager and no Ubuntu Software Centre running

sudo add-apt-repository ppa:cinelerra-ppa/ppa

Update the package managers with the names of the packages from the cinelerra repo...

sudo apt-get update

Install Cinelerra...

sudo apt-get install cinelerra-cv

Once installed, you'll find Cinelerra under the Video Production menu in Ubuntu Studio.
Despite this, you should run it from the command line with the command cinelerra
as there is a lot of useful output sent to the console.
Then off to youtube to watch some lessons on how to use it...


Did you like this?
Tip cyberfella with Cryptocurrency

Donate Bitcoin to cyberfella

Scan to Donate Bitcoin to cyberfella
Scan the QR code or copy the address below into your wallet to send some bitcoin:

Donate Bitcoin Cash to cyberfella

Scan to Donate Bitcoin Cash to cyberfella
Scan the QR code or copy the address below into your wallet to send bitcoin:

Donate Ethereum to cyberfella

Scan to Donate Ethereum to cyberfella
Scan the QR code or copy the address below into your wallet to send some Ether:

Donate Litecoin to cyberfella

Scan to Donate Litecoin to cyberfella
Scan the QR code or copy the address below into your wallet to send some Litecoin:

Donate Monero to cyberfella

Scan to Donate Monero to cyberfella
Scan the QR code or copy the address below into your wallet to send some Monero:

Donate ZCash to cyberfella

Scan to Donate ZCash to cyberfella
Scan the QR code or copy the address below into your wallet to send some ZCash:

Backing up your ageing DVD collection efficiently

This post is basically a follow on from a previous post “Backing up your ageing CD collection efficiently”, so the title is kind of a play on words.

There are two ways to go (or both) when it comes to “backing up” your digital versatile discs, the first is to copy the disc to an .iso image for digital storage.

Being a big fan of efficiency, I am an advocate of command line power (or terminal emulator power if you’re being pedantic).

dd if=/dev/dvd of=~/mydvd.iso

You may need to replace /dev/dvd with /dev/sr0 if your DVDROM drive is USB powered.

You may also need to install libdvdcss2 to read the DVD if it’s encrypted/copy protected.  sudo apt-get install libdvdcss2 should nail that.  If not, google medibuntu and follow the instructions to add the medibuntu repository to your package manager, then install libdvdcss2, amongst other multimedia goodies on offer (such as w32codecs).

So, with your DVD backed up to an ISO file, you’re done.  Well yes, but those ISO files are pretty big at 4GB+, so why not go the extra mile and mount the .iso as a loopback device, then use the wonderfully simple DVDRIP program to re-encode the 4GB video on the mounted .iso file into a less space hungry, compressed video format that weighs in at a mere 700MB?

mkdir ~/myiso

sudo mount -t iso9660 -o loop /path/to/mydvd.iso /home/matt/myiso

If you haven’t already installed dvdrip, then…

sudo apt-get install dvdrip rar

Then run dvdrip and configure it with valid paths where necessary so it can store its files during the rip and re-encoding process.  The paths show as red if they’re invalid and go green when they’re valid.  Type /home/matt/myiso for the DVDROM device (where it says /dev/dvd by default) to rip the video from your mounted .iso file instead of an actual dvdrom device.  dvdrip won’t be able to tell the difference since the kernels loopback module is now presenting the .iso file as a device.

You should now be able to read the table of contents and re-encode the “DVD” into a compressed video format of your choosing, reducing it’s resulting filesize to as low as 700MB before loosing too much in the way of quality provided “2 pass encoding” is checked.  The re-encoding process will take time – how much depends on your CPU.

Above: dvdrip ripping the selected video chapter from a mounted dvd .iso image file


Above: dvdrip re-encoding the ripped chapter to a 700Mb xvid (.avi) compressed video format using 2-pass encoding

Did you like this?
Tip cyberfella with Cryptocurrency

Donate Bitcoin to cyberfella

Scan to Donate Bitcoin to cyberfella
Scan the QR code or copy the address below into your wallet to send some bitcoin:

Donate Bitcoin Cash to cyberfella

Scan to Donate Bitcoin Cash to cyberfella
Scan the QR code or copy the address below into your wallet to send bitcoin:

Donate Ethereum to cyberfella

Scan to Donate Ethereum to cyberfella
Scan the QR code or copy the address below into your wallet to send some Ether:

Donate Litecoin to cyberfella

Scan to Donate Litecoin to cyberfella
Scan the QR code or copy the address below into your wallet to send some Litecoin:

Donate Monero to cyberfella

Scan to Donate Monero to cyberfella
Scan the QR code or copy the address below into your wallet to send some Monero:

Donate ZCash to cyberfella

Scan to Donate ZCash to cyberfella
Scan the QR code or copy the address below into your wallet to send some ZCash:

Tuning an SSD powered Linux PC

So you’ve bought an SSD to give your everyday computing device a performance boost?  Well done.

The good news is, if you’re running Linux, there’s a handful of things you can do to make the most of your new super-powered block storage device.  My results below speak for themselves.  The bad news is, if you’re just a gadget consumer who has to have the latest and greatest, then simply buying it, fitting it and reinstalling the OS / cloning your previous drive is not going to cut it.  It’s more common sense than out-and-out rocket science, but whatever your OS, you can use my guide to give you ideas on what you can do to improve both performance and possibly the longevity of your device.  Being relatively new to the consumer market, the longevity of solid state block storage devices is yet to be seen.  At least you can do your bit to reduce the number of writes going to the device and (one would think) extend its life.

I chose to buy two relatively small capacity Intel SSD’s, connected each one to its own SATA controller on the system board and mount / on one and /home on the other.  I don’t see the point in buying large capacity SSD’s when it’s the performance you’re after rather than huge capacity to store your documents, photos, mp3, movie and software collections on – Thats what relatively cheap 2TB USB HDD’s and Cloud Storage providers like DropBox and Ubuntu One are for.  Oh and buy two of those two external HDD’s too because nobody wants to see 2TB of their data go irretrievably down the pan.

Incidentally, if you do lose data there is a nice previous blog entry on data forensics that will help you get it back. Search for forensics at the top or follow this link for that…

Disk Recovery and Forensics

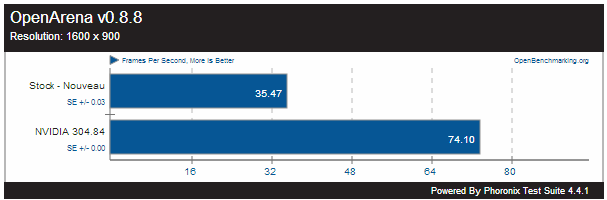
Anyway, here’s the comparison of HDD performance to whet your appetite.

single hard disk in Lenovo IdeaCentre Q180

New dual SSD’s in HP dc7900 SFF PC

Tuning your SSD powered system…

Make sure the partitions are aligned.  This means that when a block is written to the filesystem, there are far fewer boundaries crossed on the ssd with each block written.

Much is written on the web about how to achieve this, I found the easiest way was to create a small ext2 /boot partition on the front of one drive, swap on the front of the other, and create my big / and /home partitions at the end of the disks (I have two remember) when using the manual partitioning tool gparted during installation.  By doing this, when i divided my starting sector number (returned by fdisk -l) by 512, i found the number was perfectly divisable – which is indicative of properly aligned partitions.  Job done then.

For each ssd in your computer, prepend noatime and discard to the options, leaving errors=remount-ro or defaults on the end.

/dev/sda   /   ext4   noatime,discard,errors=remount-ro 0 1

Change the scheduler from noop to deadline.
Add the following line for each SSD in your system:

echo deadline >/sys/block/sda/queue/scheduler

Make it do this each time you reboot
As root, vi /etc/rc.local and add these above the exit 0 line at the end of the file

echo deadline > /sys/block/sda/queue/scheduler
echo 1 > /sys/block/sda/queue/iosched/fifo_batch

GRUB Boot loader

vi /etc/default/grub    and change the following line…

GRUB_CMDLINE_LINUX_DEFAULT=”elevator=deadline quiet splash”

sudo update-grub

Reduce how aggressive swap is on the system.  A linux system with 2GB or more RAM will hardly ever swap.

echo 0 > /proc/sys/vm/swappiness
sudo vi /etc/sysctl.conf
change vm.swappiness=1

vm.vfs_cache_pressure=50

Move tmp areas to memory instead of ssd.  You’ll lose the contents of these temporary filesystems between boots, but on a desktop that may not be important.
In your /etc/fstab, add the following:

tmpfs   /tmp       tmpfs   defaults,noatime,mode=1777   0  0
tmpfs   /var/spool tmpfs   defaults,noatime,mode=1777   0  0
tmpfs   /var/tmp   tmpfs   defaults,noatime,mode=1777   0  0
tmpfs   /var/log   tmpfs   defaults,noatime,mode=0755   0  0

Move firefox cache (you’ll loose this between boots)
in firefox, type about:config and right click and create a new variable

browser.cache.disk.parent_directory

set it to /tmp

Boot from a live usb stick so the disks aren’t mounted, and as root, deactivate the journals on your ext4 partitions of your internal ssd’s e.g.

sudo tune2fs -O ^has_journal /dev/sda1

Add TRIM command to /etc/rc.local for each SSD i.e.

Above the line exit 0, add the following

fstrim -v /

fstrim -v /home     (only if your /home is mounted on a second SSD)

For computers that are always on, add trim command to /etc/cron.daily/trim

#!/bin/sh

fstrim -v / && fstrim -v /home

chmod +x /etc/cron.daily/trim

BIOS Settings

Set SATA mode to AHCI.  It will probably be set to IDE.  You’ll need to hunt for this setting is it varies between BIOS types.

SSD Firmware

Use lshw to identify your SSD and download the latest firmware from the manufacturer.  For Intel SSDs, go here

https://downloadcenter.intel.com/confirm.aspx?httpDown=http://downloadmirror.intel.com/18363/eng/issdfut_2.0.10.iso&lang=eng&Dwnldid=18363


That’s it.  I’ll add other tips to this list as and when I think of them or see them on the net.  You could reboot using a live usb and delete the residual files left behind in the tmp directories that you’ll be mounting in RAM from here on, but that’s up to you.  If you do, DO NOT remove the directories themselves or the system won’t boot.  If you do remove them, then fix it by booting using a live usb stick, mount the / partition into say, /ssd and mkdir the directories you deleted in /ssd/var/tmp and /ssd/tmp.  Be aware though that /tmp and /var/tmp have special permissions set on them.  chmod 777, followed by chmod +t to set the sticky bit -drwxrwxrwt (sticky bit set – with execution) on them.

Did you like this?
Tip cyberfella with Cryptocurrency

Donate Bitcoin to cyberfella

Scan to Donate Bitcoin to cyberfella
Scan the QR code or copy the address below into your wallet to send some bitcoin:

Donate Bitcoin Cash to cyberfella

Scan to Donate Bitcoin Cash to cyberfella
Scan the QR code or copy the address below into your wallet to send bitcoin:

Donate Ethereum to cyberfella

Scan to Donate Ethereum to cyberfella
Scan the QR code or copy the address below into your wallet to send some Ether:

Donate Litecoin to cyberfella

Scan to Donate Litecoin to cyberfella
Scan the QR code or copy the address below into your wallet to send some Litecoin:

Donate Monero to cyberfella

Scan to Donate Monero to cyberfella
Scan the QR code or copy the address below into your wallet to send some Monero:

Donate ZCash to cyberfella

Scan to Donate ZCash to cyberfella
Scan the QR code or copy the address below into your wallet to send some ZCash:

Backing up your ageing CD collection – efficiently.

Our CD’s are getting a bit old now, and if you have a large collection, ripping them to your iTunes collection gets tedious quickly.  The fastest, most efficient way as always, is to use the command line.  The Linux program abcde “A Better CD Encoder” is a fantastic, simple binary for the task.  Like many other Linux packages, it has dependencies.  The following line, is an example of how to rip an Audio CD, and re-encode the wav file to quality 320Kbps mp3 files written to your home directory.

abcde -o mp3:”-b 320″ -a move,clean

The following script, which I’ve called mytunes.sh will handle all dependencies if needed, and run the above command so you don’t have to remember the syntax.  Don’t forget to chmod 777 it to make it executable.

#!/bin/sh

# This script will turn your CD into a bunch of fully tagged mp3 files.  Just pop the CD in, and run ./mytunes.sh

# Software pre-req checks…
if [ ! -f /usr/bin/cdparanoia ]; then
    print “Attempting to retrieve the cdparanoia cd ripping package…”
    sudo apt-get install cdparanoia
fi
if [ ! -f /usr/bin/lame ]; then
    print “Attempting to retreive the lame mp3 encoding package…”
    sudo apt-get install lame
fi
if [ ! -f /usr/bin/abcde ]; then
    print “Attempting to retreive abcde A Better CD Encoder package…”
    sudo apt-get install id3v2 cd-discid abcde
fi

#Yes, you read it right.  One line of actual code to do the meaty bit.
abcde -o mp3:”-b 320″ -a move,clean

# SOFTWARE PRE-REQUISITES (handled by script if non-existent)
# cdparanoia     Takes the wavs off the CD
# lame         mp3 encoder
# abcde     A Better CD Encoder
# cd-discid     Uses the Disc ID to obtain CDDB information for mp3 files.
# id3v2     Command    line id3 tag editor

Did you like this?
Tip cyberfella with Cryptocurrency

Donate Bitcoin to cyberfella

Scan to Donate Bitcoin to cyberfella
Scan the QR code or copy the address below into your wallet to send some bitcoin:

Donate Bitcoin Cash to cyberfella

Scan to Donate Bitcoin Cash to cyberfella
Scan the QR code or copy the address below into your wallet to send bitcoin:

Donate Ethereum to cyberfella

Scan to Donate Ethereum to cyberfella
Scan the QR code or copy the address below into your wallet to send some Ether:

Donate Litecoin to cyberfella

Scan to Donate Litecoin to cyberfella
Scan the QR code or copy the address below into your wallet to send some Litecoin:

Donate Monero to cyberfella

Scan to Donate Monero to cyberfella
Scan the QR code or copy the address below into your wallet to send some Monero:

Donate ZCash to cyberfella

Scan to Donate ZCash to cyberfella
Scan the QR code or copy the address below into your wallet to send some ZCash:

Merging and Splitting avi’s

Everybody loves DIVX/XVID .avi files.  Here’s a couple of useful tips when dealing with them.  You may want to join together two halves or split a large video file into multiple, smaller files for easier handling between storage devices.


MERGING AVI FILES

install transcode (sudo apt-get install transcode)

avimerge -o merged.avi -i part1.avi part2.avi

Its as simple as that.


SPLITTING AVI FILES

To split a file into two pieces, install mencoder (sudo apt-get install mencoder) and execute the following commands:

mencoder -endpos 01:00:00 -ovc copy -oac copy movie.avi -o first_half.avi

mencoder -ss 01:00:00 -oac copy -ovc copy movie.avi -o second_half.avi

Done!

Did you like this?
Tip cyberfella with Cryptocurrency

Donate Bitcoin to cyberfella

Scan to Donate Bitcoin to cyberfella
Scan the QR code or copy the address below into your wallet to send some bitcoin:

Donate Bitcoin Cash to cyberfella

Scan to Donate Bitcoin Cash to cyberfella
Scan the QR code or copy the address below into your wallet to send bitcoin:

Donate Ethereum to cyberfella

Scan to Donate Ethereum to cyberfella
Scan the QR code or copy the address below into your wallet to send some Ether:

Donate Litecoin to cyberfella

Scan to Donate Litecoin to cyberfella
Scan the QR code or copy the address below into your wallet to send some Litecoin:

Donate Monero to cyberfella

Scan to Donate Monero to cyberfella
Scan the QR code or copy the address below into your wallet to send some Monero:

Donate ZCash to cyberfella

Scan to Donate ZCash to cyberfella
Scan the QR code or copy the address below into your wallet to send some ZCash:

Adding additional mailboxes to Outlook

If you want to add an additional mailbox to Outlook, e.g. a shared mailbox for your team to view alongside your regular Inbox, then follow the following instructions.  It’s not intuitive, requires an understanding of the context of what you’re actually doing in Microsoft lingo, i.e. You are adding an additional Mailbox to your existing Outlook Profile, not adding an Additional Mailbox to Outlook per se, (which is done outside of Outlook via the Mail icon in Control Panel and effectively creates an Additional Outlook Profile which you’ll be prompted to choose from each time you subsequently start Outlook).

Tools, Account Settings

Highlight your Account, and click Change (the bit that isn’t obvious / intuitive in my opinion).

Click on More Settings in the lower right hand corner.

The Mailboxes dialog appears and may well be blank.  Click Add to add additional mailboxes.  You’ll likely need to know the name of it.

The additional mailbox will now be added to the folders treeview pane in Outlook in your existing profile.

Did you like this?
Tip cyberfella with Cryptocurrency

Donate Bitcoin to cyberfella

Scan to Donate Bitcoin to cyberfella
Scan the QR code or copy the address below into your wallet to send some bitcoin:

Donate Bitcoin Cash to cyberfella

Scan to Donate Bitcoin Cash to cyberfella
Scan the QR code or copy the address below into your wallet to send bitcoin:

Donate Ethereum to cyberfella

Scan to Donate Ethereum to cyberfella
Scan the QR code or copy the address below into your wallet to send some Ether:

Donate Litecoin to cyberfella

Scan to Donate Litecoin to cyberfella
Scan the QR code or copy the address below into your wallet to send some Litecoin:

Donate Monero to cyberfella

Scan to Donate Monero to cyberfella
Scan the QR code or copy the address below into your wallet to send some Monero:

Donate ZCash to cyberfella

Scan to Donate ZCash to cyberfella
Scan the QR code or copy the address below into your wallet to send some ZCash:

Edit wbar dock and conky in crunchbang/openbox

Besides editing the menu.xml to customise the menu, why not install wbar and edit /usr/share/wbar/dot.wbar to add convenient quick launch icons to the wbar dock for the most commonly called upon apps.  It’s even simpler than editing the menu.xml file, especially if you use vi.

My desktop is quite nicely themed and as conky shows, is very light on resources.

conky – the monitor on the left hand side of the screen can be customised by editing .conkyrc in your home directory.  To install it, simply type sudo apt-get install conky then get hacking.

To effect the changes, simply right click on wbar, or restart the conky process using kill -HUP

Did you like this?
Tip cyberfella with Cryptocurrency

Donate Bitcoin to cyberfella

Scan to Donate Bitcoin to cyberfella
Scan the QR code or copy the address below into your wallet to send some bitcoin:

Donate Bitcoin Cash to cyberfella

Scan to Donate Bitcoin Cash to cyberfella
Scan the QR code or copy the address below into your wallet to send bitcoin:

Donate Ethereum to cyberfella

Scan to Donate Ethereum to cyberfella
Scan the QR code or copy the address below into your wallet to send some Ether:

Donate Litecoin to cyberfella

Scan to Donate Litecoin to cyberfella
Scan the QR code or copy the address below into your wallet to send some Litecoin:

Donate Monero to cyberfella

Scan to Donate Monero to cyberfella
Scan the QR code or copy the address below into your wallet to send some Monero:

Donate ZCash to cyberfella

Scan to Donate ZCash to cyberfella
Scan the QR code or copy the address below into your wallet to send some ZCash: