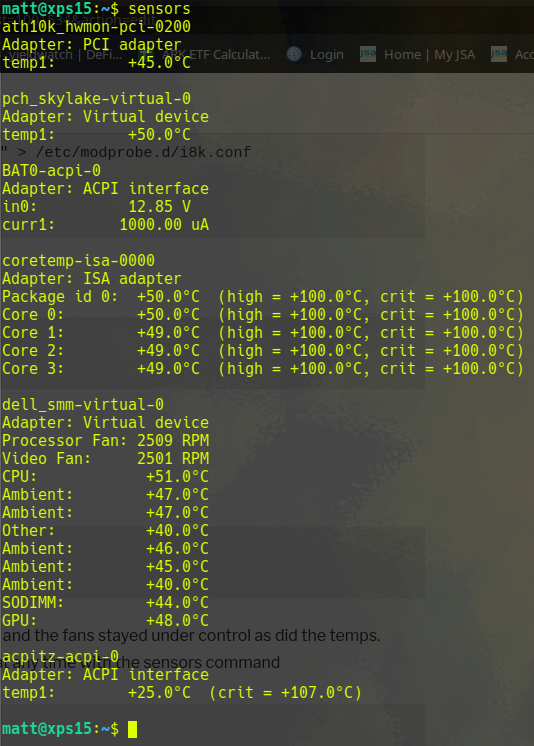
I left the config file at the defaults and the fans stayed under control as did the temps. check the temps and fan speeds at any time with the sensors command
sensors
45 – 50 degrees C and 2500 RPM fan speeds whilst running Brave and Virtual Box
Did you like this? Tip cyberfella with Cryptocurrency
The danger with USB hard disk drives is that when you have more than one plugged into your workstation, the device name assigned to it by the operating system might not be consistent between reboots. i.e. /dev/sdb1 and /dev/sdb2 might swap places. Potential disaster if you rsync data from one to the other on a periodic basis.
If permanently mounting usb hard disks, it’s much safer to mount according to the UUID of the disk instead of the device name assigned by the OS.
If you change to root using sudo su – and cd into /dev/disk you’ll see that there are multiple links in there, organised into different folders. The unique unit id is written in /dev/disk/by-uuid and links the device name to the unique id.
You can see what device name is mounted where using df -h. Then use the output of ls -al of /dev/dsk/by-uuid to correlate uuid to filesystem mount. There’s probably other ways to match filesystem to uuid but this is quick and easy enough to do.
Note that I’ve also taken the liberty of piping the commands through grep to reduce output, just showing me what I want to know, i.e. the uuid’s mounted to devices named /sda1, /sda2, /sdb1 etc.
Once you’re confident you know what UUID is what disk, then you can permanently mount the disk or disks that are permanent fixtures by creating a mount point in the filesystem and adding a line to /etc/fstab
finally, mount -a will pick up the UUID and mount it into the mount point.
Did you like this? Tip cyberfella with Cryptocurrency
If like me, you have a Dell laptop running linux and you want to bring your firmware up to date, you’ll realise that the executables downloadable from Dell’s support site require Windows OS to run. Or do they? The good new is No. They don’t.
OK, so they won’t run on Linux either, but they will run from a FreeDOS command line.
Create a bootable USB Stick using THESE instructions…
mkdir -p /tmp/cdrom
sudo mount -o loop,exec ~/Downloads/systemrescuecd-x86-4.5.4.iso #your version maybe newer!
plug in the usb stick #be prepared to loose everything on it!
cd /tmp/cdrom
sudo bash ./usb_inst.sh
Create a folder on the USB stick called Dell for example, and copy the BIOS update for your computer into it.
Boot the computer with the USB stick and choose the FreeDOS option (it can be found in one of the menus), otherwise it’ll boot into the default linux command line environment, and you don’t want that for this.
At the FreeDOS command prompt A:> change to C:> and type dir to view the files on the USB stick.
You should see the Dell directory you created. cd into the Dell directory and run the executable BIOS upgrade program.
Reboot into your Linux OS. The following commands show the firmware level and other info for your computer.
You may need to install libsmbios first
sudo apt-get install libsmbios-bin
Did you like this? Tip cyberfella with Cryptocurrency
So you’ve bought an SSD to give your everyday computing device a performance boost? Well done.
The good news is, if you’re running Linux, there’s a handful of things you can do to make the most of your new super-powered block storage device. My results below speak for themselves. The bad news is, if you’re just a gadget consumer who has to have the latest and greatest, then simply buying it, fitting it and reinstalling the OS / cloning your previous drive is not going to cut it. It’s more common sense than out-and-out rocket science, but whatever your OS, you can use my guide to give you ideas on what you can do to improve both performance and possibly the longevity of your device. Being relatively new to the consumer market, the longevity of solid state block storage devices is yet to be seen. At least you can do your bit to reduce the number of writes going to the device and (one would think) extend its life.
I chose to buy two relatively small capacity Intel SSD’s, connected each one to its own SATA controller on the system board and mount / on one and /home on the other. I don’t see the point in buying large capacity SSD’s when it’s the performance you’re after rather than huge capacity to store your documents, photos, mp3, movie and software collections on – Thats what relatively cheap 2TB USB HDD’s and Cloud Storage providers like DropBox and Ubuntu One are for. Oh and buy two of those two external HDD’s too because nobody wants to see 2TB of their data go irretrievably down the pan.
Incidentally, if you do lose data there is a nice previous blog entry on data forensics that will help you get it back. Search for forensics at the top or follow this link for that…
Anyway, here’s the comparison of HDD performance to whet your appetite.
single hard disk in Lenovo IdeaCentre Q180
New dual SSD’s in HP dc7900 SFF PC
Tuning your SSD powered system…
Make sure the partitions are aligned. This means that when a block is written to the filesystem, there are far fewer boundaries crossed on the ssd with each block written.
Much is written on the web about how to achieve this, I found the easiest way was to create a small ext2 /boot partition on the front of one drive, swap on the front of the other, and create my big / and /home partitions at the end of the disks (I have two remember) when using the manual partitioning tool gparted during installation. By doing this, when i divided my starting sector number (returned by fdisk -l) by 512, i found the number was perfectly divisable – which is indicative of properly aligned partitions. Job done then.
For each ssd in your computer, prepend noatime and discard to the options, leaving errors=remount-ro or defaults on the end.
Reduce how aggressive swap is on the system. A linux system with 2GB or more RAM will hardly ever swap.
echo 0 > /proc/sys/vm/swappiness sudo vi /etc/sysctl.conf change vm.swappiness=1
vm.vfs_cache_pressure=50
Move tmp areas to memory instead of ssd. You’ll lose the contents of these temporary filesystems between boots, but on a desktop that may not be important.
In your /etc/fstab, add the following:
That’s it. I’ll add other tips to this list as and when I think of them or see them on the net. You could reboot using a live usb and delete the residual files left behind in the tmp directories that you’ll be mounting in RAM from here on, but that’s up to you. If you do, DO NOT remove the directories themselves or the system won’t boot. If you do remove them, then fix it by booting using a live usb stick, mount the / partition into say, /ssd and mkdir the directories you deleted in /ssd/var/tmp and /ssd/tmp. Be aware though that /tmp and /var/tmp have special permissions set on them. chmod 777, followed by chmod +t to set the sticky bit -drwxrwxrwt (sticky bit set – with execution) on them.
Did you like this? Tip cyberfella with Cryptocurrency
Behold the Zalman ZM-VE200 (branded internationally as IODD) – a 2.5″ HDD enclosure that has a neat trick up it’s sleeve – the ability to present .iso files written to its _iso folder as if they were a CD/DVD i.e. Virtual optical drive technology. Saves carrying around a pocket full of scratched cd’s. Just download the .iso and boot off it. No burning to CD first, and perfect if there’s no cdrom drive present (but requires boot from usb capable bios).
It’s worth mentioning the default firmware supports ntfs out of the box – i.e. unless the drive is formatted with an ntfs filesystem, the virtual cdrom drive folder _iso will not work. ntfs is a good choice since both windows and linux (desktop distros at least) can read it these days and unlike fat32, it supports large files – necessary for storing bootable dvd isos. If fat32 is absolutely necessary for universal compatibility though, you can download and install the firmware to make it work in fat32 mode instead of the ntfs mode that it ships with. If I recall, this involves downloading the firmware file to the _iso folder and booting off it – but check the documentation on the zalman website. It’s a simple procedure, but will limit the size of the iso that can be written to the disk. Having converted mine to fat32, I might go back to ntfs firmware. I have multiple storage devices so there’s always something formatted with fat32 kicking about if necessary.
Did you like this? Tip cyberfella with Cryptocurrency
Despite being a massive fan of the Acer Aspire Revo 3600 that I bought a few years ago, my little £149.99 nettop is just a touch slow these days and could probably do with being upgraded.
My instant reaction was to go for the £174.97 Acer Aspire Revo 3700 and it would be a great choice too, however it’s 1.8GHz CPU would appear to have been trumped slightly by the 2.13GHz CPU in the £179.99 offering from Lenovo – The IdeaCenter Q180.
Yes you read those prices right. I use Linux (free) and keep the price of my hardware as low as possible. Any compromises on performance will be offset by operating system choice and subsequent tuning, although I’m not expecting to have to do an awful lot of that given it’s “whopping” 2GB RAM, 2.13GHz CPU and ATI Radeon graphics chip (full spec given below). Watch this space.
I came home on Friday evening to find my DLNA server wasn’t available :(. It’s not the scenario I needed after an intense few days squeezing 5 days worth of work into a 4 day week due to the Easter bank holiday weekend, plus the 3 hour drive home.
Firstly, my DLNA server is simply Serviio running on a Xubuntu VM which mounts an NFS share containing my media files.
The virtual infrastructure in my lab that underpins it is a two node ESXi cluster with a third node running Openfiler to provide the shared storage to ESXi. This includes a RAID 0 (not recommended I might add) iSCSI target for maximum IO within a constrained home budget and a 1TB USB HDD containing a NFS Datastore where I store my ISO’s and vm backups so as to save space on the relatively expensive, high performance iSCSI target intended for the VM’s disk files, which are also thinly provisioned to further save on space. The Openfiler NAS also has a second 1TB USB HDD containing a second NFS Media Store share, mounted by Serviio/Xubuntu VM already mentioned (as well as any other machine in the network). The network is an 8 port, 1 GB/s managed switch with two VLANs and two Networks, one which joins the rest of the LAN, and one which just contains VMotion and iSCSI traffic.
So, like I said, my Serviio DLNA server was u/a and some troubleshooting was in order.
My first reaction was that something was wrong in VMWare Land, but this turned out not to be the case – however, the storage configuration tab revealed that the NFS datastores were not available, and df -h on my workstation confirmed it, so almost immediately my attention switched from VMWare to Openfiler.
Now, I won’t go into it too much here, but I’m torn with Openfiler. The trouble is most folks would only ever interface with the web-based GUI, and they’d quickly come unstuck, since conary updateall to install all the latest updates or not, certain changes don’t seem to get written back. I had to perform all my LVM configuration manually at the command line as root, not via the web-gui as openfiler. I’ve yet to investigate this any further as it’s now working OK for me, but my guess would be a permissions issue.
I connected to the Openfiler web interface and could see that the shared folders (shown below) were missing, so the NFS shares were not being shared but more importantly it also implied that the logical volumes containing the filesystems exported via NFS were not mounted. df -h on Openfiler’s command line interface confirmed this.
In order to check that Openfiler could see the hard drives at all, I issued the command fdisk -l but because the USB HDD’s are LVM physical volumes, they have gpt partition tables on them, not msdos, so fdisk does not support it, but is kind enough to recommend using GNU Parted instead. Despite the recommendation, I used lshw > /tmp/allhardware and just used vi to go looking for the hard drive information. The USB HDD’s are Western Digital, so I just :/WD to find them amongst the reams of hardware information, and find them I did. Great, so the OS could see the disks, but they weren’t mounted. I quickly checked /etc/fstab and sure enough, the devices were in there, but mount -a wasn’t fixing the problem.
Remember I mentioned that the drives had a gpt partition table, and that they were LVM physical volumes? Well therein lies the problem. You can’t mount a filesystem on a logical volume if the volume group that it is a part of is not activated. Had my volume groups deactivated? Yes, they had.
vgchange -ay /dev/vg_nfs
vgchange -ay /dev/vg_vmware
Now my volume groups were active, mount -a should work, confirmed by df -h showing that the /dev/mapper/vg_vmware-lv_vmware and /dev/mapper/vg_nfs-lv_nfs block storage devices were now mounted into /mnt/vg_vmware/lv_vmware and /mnt/vg_nfs/lv_nfs respectively. exportfs -a should reshare the NFS shares provided the details were still in /etc/exports which they were. Going back to the Openfiler web-interface, the shares tab now revealed the folders shown in blue (above) and their mount points needed by any NFS clients in order to mount them. Since the mountpoint details were already in /etc/fstab on my workstation, mount -a re-mounted them and into /nfs/nfsds and /nfs/nfsms and ls -al showed that the files were all there.
rdesktop to my VirtualCenter server, mount -a in the Xubuntu terminal to remount them on the DLNA server, re-run serviio.sh and that’s it.
So that’s how I diagnosed what was wrong and how I fixed it. Now I just need to investigate the system logs on Openfiler to see why the volume groups deactivated in the first place. After continuous uptime without issue for 4 months, I must admit that it did come as a surprise.
Did you like this? Tip cyberfella with Cryptocurrency