Oracle/Solaris 11 Virtualization on M5-32 and M6-32 Servers

This concise post is intended to provide a terminology and concepts reference for the Oracle M5-32 and M6-32 Servers, the Domain Configurable Units (DCU’s) of which are divided into one isolated to four combined “Bounded (1)” or “Non-bounded (2-4)” Physical Domains.  The combined or “non-bounded” DCU’s are connected via the Scalability Switchboards in order to combine their resources into a single Physical Domain.  Each Physical Domain can be further divided into 192/384 Logical Domains on M5-32 or M6-32 Servers by using “Oracle VM Server for SPARC” software.  Each Logical Domain runs it’s own instance of the Oracle Solaris 11 operating system that can run thousands of Zones.  Each zone is a means of isolating applications running on the same Solaris 11 operating system instance.  Each zone contains a controlled environment through which you can allocate the exact resources an application requires.  More on Zones in a separate, complimenting post.  This post covers the server hardware layer through to the zone layer in the technology stack (illustrated below).

Oracle M5-32 and M6-32 Servers

DCU’s provide the building blocks of Physical Domains.

A Physical Domain operates as a server with full hardware isolation from the other physical domains.

DCU’s can be combined or divided into 1 – 4 physical domains to suit business application requirements.

Each Physical Domain can be restarted without affecting other Physical Domains in the M5-32 / M6-32 Server.

An initial hardware purchase of a minimum of 8 processors can be configured into 1 or 2 Physical Domains and the remainder purchased later for expansion.

A maximum of 32 processors and 32TB memory per M5/M6 Server is possible.

Scalability Switchboards

The physically separate DCU’s can be joined together to make a single Physical Domain that spans multiple Domain Configurable Units.  The communications are serviced by the Scalability Switch Boards.

A “Bounded” Physical Domain is one whereby a single DCU is allocated to a single Physical Domain and is therefore not connected to the Scalability Switch Boards, isolating it from the other DCU’s.

A Bounded Physical Domain can operate on 2 processors, whereas non-bounded require a minimum of 4.

A single M5/M6 server can be a mix of Bounded and Un-bounded (combined) Physical Domains.

Supported Virtualization Software (LDOMs and Solaris Zones)

LDOMs

Oracle VM Server for SPARC is installed and supports the creation of 192/384 Logical Domains on M5-32/M6-32 Servers respectively.

Each LDOM can be configured and rebooted independently of the others.

Each LDOM runs its own instance of the Oracle Solaris 11 operating system.

Solaris Zones

Each instance of the Solaris 11 Operating System that comes pre-installed on each Logical Domain running Oracle VM Server supports Solaris Zones.

Each Zone contains a controlled environmen through which you can allocate the exact operating system resources that an application needs.

Zones are ultimately used to isolate applications running on the same instance of Solaris 11 in the same Logical Domain so that they don’t interfere with each other in terms of pre-alocated resource maximums and also files written to the underlying OS file system.

Solaris 11 supports thousands of zones on any given LDOM.

Links/Further Reading

M5-32 and M6-32 Server Documentation

Best Practices Whitepapers

M5 Documentation

M6 Documentation

Oracle Virtualization Products and Solutions

Did you like this?
Tip cyberfella with Cryptocurrency

Donate Bitcoin to cyberfella

Scan to Donate Bitcoin to cyberfella
Scan the QR code or copy the address below into your wallet to send some bitcoin:

Donate Bitcoin Cash to cyberfella

Scan to Donate Bitcoin Cash to cyberfella
Scan the QR code or copy the address below into your wallet to send bitcoin:

Donate Ethereum to cyberfella

Scan to Donate Ethereum to cyberfella
Scan the QR code or copy the address below into your wallet to send some Ether:

Donate Litecoin to cyberfella

Scan to Donate Litecoin to cyberfella
Scan the QR code or copy the address below into your wallet to send some Litecoin:

Donate Monero to cyberfella

Scan to Donate Monero to cyberfella
Scan the QR code or copy the address below into your wallet to send some Monero:

Donate ZCash to cyberfella

Scan to Donate ZCash to cyberfella
Scan the QR code or copy the address below into your wallet to send some ZCash:

Solaris Zones Essentials

Solaris Zones (aka Containers) are Solaris virtual machines (Non-Global Zones) running on an underlying Solaris host (The Global Zone), i.e.

-NON-GLOBAL ZONE-       -Can be a “Spars Root”, “Whole root”, or “Branded” zone.
—-GLOBAL ZONE—–       -The host OS
——HARDWARE——       -The “tin”

A NON-GLOBAL ZONE is a virtual machine and can be a “Spars Root”, “Whole root”, or “Branded” zone.
A SPARS ROOT ZONE shares parts of the GLOBAL zone (host’s) filesystem, usually in a read-only manner, i.e. if you patch the GLOBAL ZONE, you’ll patch the spars root zones too.
A WHOLE ROOT ZONE takes 100% copy of GLOBAL zone and is therefore 100% independent of it.
A BRANDED ROOT ZONE allows for an entirely different version of Solaris to be installed, and is also 100% independent and different to the GLOBAL zone running on the underlying hardware.

PREPARATION

ifconfig      -List network cards and decide what ones you want to use for the non-global zone

CONFIGURATION OF A NEW ZONE

zonecfg -z <zone-name>      -Configure system for new zone and write configuration file to /etc/zones/ on GLOBAL zone.
“No such zone configured, use create to create zone”
zonecfg:appserv3> create
zonecfg:appserv3> set zonepath=/zone2/appserver2
zonecfg:appserv3> add net
zonecfg:appserv3:net> set physical=el1000g0      -Use ifconfig to choose from list of NICs.
zonecfg:appserv3:net> set address=192.168.1.101
zonecfg:appserv3:net> end
zonecfg:appserv3> info               -Lists all input settings, including names of settings not specified.
zonecfg:appserv3> verify            -Verify settings are viable
zonecfg:appserv3> commit        -Save changes to /etc/zones/<zone-name>.xml
zonecfg:appserv3> exit               -Exit zonecfg

INSTALL NEW ZONE

zoneadm -z <zone name> install      -Install new zone.  Takes a while.

DISPLAY INFO ABOUT ZONES

zoneadm list -cvi     -List info about zones installed on system.

FIRST BOOT

zoneadm -z <zone-name> boot      -Boot new zone

FIRST LOGIN

login -z login -C -e [ <zone-name>      -Login to zone, Provide system info (C)onsole. Escap(e) character [
zlogin -C -e [ <zone-name>                   -Alternative login command.
“Console is already in use by PID ####” -kill -9 ####

KILL STUCK/TRAPPED TERMINAL SESSION

It’s possible to get trapped in the zone if you select the wrong terminal type.

To overcome this, start another session to the GLOBAL zone, attempt to log back into the NON-GLOBAL zone
and it’ll tell you the PID of the session. Kill that session. kill -9 <PID>

UNINSTALLING A NON-GLOBAL ZONE

zoneadm list -vci                                       -List all non-global zones
zoneadm -z <zone-name> halt              -Shut down the non-global zone
zoneadm -z <zone-name> uninstall     -Uninstall the non-global zone
zonecfg -z <zone-name> delete             -Delete the non-global zone


Did you like this?
Tip cyberfella with Cryptocurrency

Donate Bitcoin to cyberfella

Scan to Donate Bitcoin to cyberfella
Scan the QR code or copy the address below into your wallet to send some bitcoin:

Donate Bitcoin Cash to cyberfella

Scan to Donate Bitcoin Cash to cyberfella
Scan the QR code or copy the address below into your wallet to send bitcoin:

Donate Ethereum to cyberfella

Scan to Donate Ethereum to cyberfella
Scan the QR code or copy the address below into your wallet to send some Ether:

Donate Litecoin to cyberfella

Scan to Donate Litecoin to cyberfella
Scan the QR code or copy the address below into your wallet to send some Litecoin:

Donate Monero to cyberfella

Scan to Donate Monero to cyberfella
Scan the QR code or copy the address below into your wallet to send some Monero:

Donate ZCash to cyberfella

Scan to Donate ZCash to cyberfella
Scan the QR code or copy the address below into your wallet to send some ZCash:

Whats filled up my filesystem?

If df -h reveals that one of your linux filesystems is full, you’ll be asking yourself whats filled it.

find /myfs -mtime +1 -type f -size +1000000 -exec ls -al {} \;
Replace /myfs with the the name of the filesystem thats filled according to df -h
Knock a zero off -size and repeat to drill down into the largest files
Add 1 to -mtime to go back 1, 2, 3 days etc to see the largest files written to in the last 1, 2, 3 days.
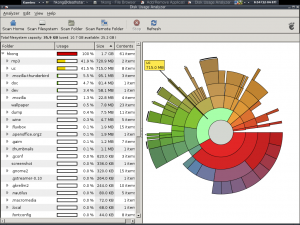
If you’re lucky enough to have a GUI and internet connectivity (highly unlikely on a linux server in the datacenter), install a tree mapper such as baobab (equivalent to sequoia view for Windows).
baobab
Did you like this?
Tip cyberfella with Cryptocurrency

Donate Bitcoin to cyberfella

Scan to Donate Bitcoin to cyberfella
Scan the QR code or copy the address below into your wallet to send some bitcoin:

Donate Bitcoin Cash to cyberfella

Scan to Donate Bitcoin Cash to cyberfella
Scan the QR code or copy the address below into your wallet to send bitcoin:

Donate Ethereum to cyberfella

Scan to Donate Ethereum to cyberfella
Scan the QR code or copy the address below into your wallet to send some Ether:

Donate Litecoin to cyberfella

Scan to Donate Litecoin to cyberfella
Scan the QR code or copy the address below into your wallet to send some Litecoin:

Donate Monero to cyberfella

Scan to Donate Monero to cyberfella
Scan the QR code or copy the address below into your wallet to send some Monero:

Donate ZCash to cyberfella

Scan to Donate ZCash to cyberfella
Scan the QR code or copy the address below into your wallet to send some ZCash:

nohup and disown your long running jobs

Ever started a job and thought “this is running on a bit longer than I expected”, then wondered whats going to happen when you go home and come back in to work tomorrow morning to find your remote session gone, which leaves you wondering “did that job complete?”.


Mmm, me too, which is where the nohup or disown commands come in.  nohup (no hangup) is a well known job control utility which will prevent a process from reacting to the hangup signal when a shell is disconnected.  Usually you’d preceed your actual command with it, e.g.

nohup rsync -auvc /Source/* /Destination/

but if your command is already running, you’re left wishing you’d nohup‘d it to start with – unless you’re running Solaris or AIX in which case the nohup command has a convenient -p switch to specify the process id (use ps -ef | grep rsync to obtain the PID of that long running data migration process, then nohup -p 9675 (or whatever the PID is of your running job).

If you’re not running Solaris or AIX, then pray you started the command in the bash shell (Linux default shell so more likely than not).  If you did, then you can

CTRL-Z

to pause the current job running in the foreground, then use the

jobs

command to determine its job number (most likely 1 if there’s no other sysadmins running backgrounded jobs), then background the process with

bg 1 

then finally

disown %1

to disconnect the process from the current shell.  Running

jobs 

again will show that your job is no longer in the list, but

ps -ef

will reveal that it is in fact still running.

Your shell can now be closed without the fear of your running job being killed with it.  Yay.

[paypal-donation]

Did you like this?
Tip cyberfella with Cryptocurrency

Donate Bitcoin to cyberfella

Scan to Donate Bitcoin to cyberfella
Scan the QR code or copy the address below into your wallet to send some bitcoin:

Donate Bitcoin Cash to cyberfella

Scan to Donate Bitcoin Cash to cyberfella
Scan the QR code or copy the address below into your wallet to send bitcoin:

Donate Ethereum to cyberfella

Scan to Donate Ethereum to cyberfella
Scan the QR code or copy the address below into your wallet to send some Ether:

Donate Litecoin to cyberfella

Scan to Donate Litecoin to cyberfella
Scan the QR code or copy the address below into your wallet to send some Litecoin:

Donate Monero to cyberfella

Scan to Donate Monero to cyberfella
Scan the QR code or copy the address below into your wallet to send some Monero:

Donate ZCash to cyberfella

Scan to Donate ZCash to cyberfella
Scan the QR code or copy the address below into your wallet to send some ZCash:

Quick surface plots using GNUPlot

GNUPlot is a free and very neat little graphing tool.  Upon installing it and running gnuplot you’ll be presented with a flashing command line prompt gnuplot>_ at which point you’ll be asking yourself “now what?”

gnuplot either plots data using plot or plots 3D surfaces using splot.

In this example, I’ll plot a surface plot (3D splot) of weekday (x), hour (y), number of jobs running (z).

gnuplot likes to be fed its data in text column format, separated with spaces or tabs but not commas e.g.

#day #hour #jobs
1 1 5
1 2 5
1 3 5
1 4 5
1 5 5
1 6 5
1 7 5
1 8 5
1 9 5
1 10 5

To create a surface plot of this data (my sample data used has values for all 24 hours in all 7 days), simply type

splot ‘path_to_data.dat’ to point to your text file containing your columns of numbers.

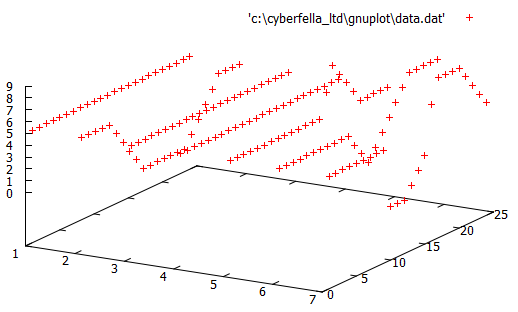
The results will be something like this.  Good, but not quite there yet.

gnuplot1


Some extra commands in the gnuplot command line window will improve the visual representation of the data, giving us the surface plot we’re ultimately after.

set dgrid3d

set grid

set view 50

set style data lines

set contour base

set hidden3d trianglepattern 7

set autoscale

Finally, use the command replot to update the graph.  The results are now much more usable, with contour lines on the base of the 3D graph to further highlight the “hot spots”, i.e. the hours of what day the most jobs are running (in my example).

gnuplot3


There’s much more fun to be had tweaking GNUPlot but I’ll leave that up to you and your imagination.  It’s worth finally mentioning  that the commands entered into gnuplot can be scripted and saved as a .plt file to compliment your .dat data file.  Then, to plot the surface maps again, you just need to load the script using…

load ‘path_to_script.plt’

Remember, the final line in your script should be

splot ‘path_to_data.dat’

so that the graph is actually generated, with all the options preceeding it.  e.g.

#My GNUPlot surface map script surf-map.plt

set dgrid3d

set grid

set view 50

set style data lines

set contour base

set hidden3d trianglepattern 7

set autoscale

splot ‘data.dat’

How you generate your actual data to be plotted is up to you.  A scheduled task/cron job which collects the data and appends it to the data.dat file is generally run as a separate shell script, e.g.

#!/bin/sh

#Insert newline into data.dat
HOURVAL=`date | awk {‘print $4’} | cut -d: -f1`
DAYVAL=`date | awk {‘print $1’}
RUNNINGGROUPSVAL=`ps -ef | grep savegrp | wc -1`

echo “${HOURVAL} ${DAYVAL} ${RUNNINGGROUPSVAL}” >> ~/data.dat

and the graphs generated at will using gnuplot.

Depending on the shapes generated by the surface map, it’s a nice touch that GNUPlot allows you to left-click on the graph and drag it around in 3 dimensions to achieve the best possible viewing angle, prior to saving the .png file, conveniently colouring the underside of the surface a different colour to the upper, visible side of the surface.

Did you like this?
Tip cyberfella with Cryptocurrency

Donate Bitcoin to cyberfella

Scan to Donate Bitcoin to cyberfella
Scan the QR code or copy the address below into your wallet to send some bitcoin:

Donate Bitcoin Cash to cyberfella

Scan to Donate Bitcoin Cash to cyberfella
Scan the QR code or copy the address below into your wallet to send bitcoin:

Donate Ethereum to cyberfella

Scan to Donate Ethereum to cyberfella
Scan the QR code or copy the address below into your wallet to send some Ether:

Donate Litecoin to cyberfella

Scan to Donate Litecoin to cyberfella
Scan the QR code or copy the address below into your wallet to send some Litecoin:

Donate Monero to cyberfella

Scan to Donate Monero to cyberfella
Scan the QR code or copy the address below into your wallet to send some Monero:

Donate ZCash to cyberfella

Scan to Donate ZCash to cyberfella
Scan the QR code or copy the address below into your wallet to send some ZCash:

MAC address on Solaris

If you need to know the MAC address of a Solaris host, running ifconfig -a as an unprivileged user does not display the MAC Address (or Hardware Address) field.

You can determine the Solaris MAC address another way.

/usr/bin/netstat -pn |grep SP


Did you like this?
Tip cyberfella with Cryptocurrency

Donate Bitcoin to cyberfella

Scan to Donate Bitcoin to cyberfella
Scan the QR code or copy the address below into your wallet to send some bitcoin:

Donate Bitcoin Cash to cyberfella

Scan to Donate Bitcoin Cash to cyberfella
Scan the QR code or copy the address below into your wallet to send bitcoin:

Donate Ethereum to cyberfella

Scan to Donate Ethereum to cyberfella
Scan the QR code or copy the address below into your wallet to send some Ether:

Donate Litecoin to cyberfella

Scan to Donate Litecoin to cyberfella
Scan the QR code or copy the address below into your wallet to send some Litecoin:

Donate Monero to cyberfella

Scan to Donate Monero to cyberfella
Scan the QR code or copy the address below into your wallet to send some Monero:

Donate ZCash to cyberfella

Scan to Donate ZCash to cyberfella
Scan the QR code or copy the address below into your wallet to send some ZCash:

Shell Scripting “test”

Here’s a quick reference guide to the tests performed on a variable as part of a shell script.

test expr or [ expr ]


Example (if $var is not set to any value)

if [[ -z $var ]]; then

echo “variable has no value”

fi


-n file                true if variable has a value set

-z file                true if variable is empty

-L                      true if file is symbolic link

file1 -nt file2      true if file1 newer than file2

file1 -ot file2      true if file1 older than file2

file1 -ef file2      true if file1 and file2 are same device and inode number.

-e file                true if file exists (NOT ON HPUX use f instead)

-x file                true if file is executable

-r file                true if file is readable

-w file               true if file is writable

-f file                 true if file is a regular file

-d directory       true if directory is a directory

-c file                true if character special file

-b file                true if block special file

-p file                true if a named pipe

-u file                true if set UID bit is set

-g file                true if set GID bit is set

-k file                true if sticky bit is set

-s file                true if filesize > 0

Did you like this?
Tip cyberfella with Cryptocurrency

Donate Bitcoin to cyberfella

Scan to Donate Bitcoin to cyberfella
Scan the QR code or copy the address below into your wallet to send some bitcoin:

Donate Bitcoin Cash to cyberfella

Scan to Donate Bitcoin Cash to cyberfella
Scan the QR code or copy the address below into your wallet to send bitcoin:

Donate Ethereum to cyberfella

Scan to Donate Ethereum to cyberfella
Scan the QR code or copy the address below into your wallet to send some Ether:

Donate Litecoin to cyberfella

Scan to Donate Litecoin to cyberfella
Scan the QR code or copy the address below into your wallet to send some Litecoin:

Donate Monero to cyberfella

Scan to Donate Monero to cyberfella
Scan the QR code or copy the address below into your wallet to send some Monero:

Donate ZCash to cyberfella

Scan to Donate ZCash to cyberfella
Scan the QR code or copy the address below into your wallet to send some ZCash:

Data Migration Shell Script Example

A nice little script written around the rsync command used to successfully migrate large amounts of data between NFS filesystems, avoiding .snapshot folders in the process.  A simple script in essence but a nice reference example nonetheless on the use of variables, functions, if statements, case statements, patterns and some useful commands, e.g. using sed to remove whitespace at the front of a variable returned by wc.

A simple but proper shell script that can almost certainly be built/improved upon using tee to write std output to a log file as well as the screen for instance, and using find to subsequently count the number of files afterwards because df is unlikely match to the nearest megabyte across different filesystems served by different NAS’s for comparison/verification.

#!/usr/bin/bash

#Generic script for migrating file systems.
#Variables Section
  SOURCE=$1
  DEST=$2

#Functions section
  function migratenonhiddenfolders(){

    echo “Re-Synchronising non-hidden top level folders only…”

  #Synchronise the data
    ls -l $SOURCE | grep ^d | awk {‘print $9’} | while read EACHDIR; do
      echo “Syncing ${SOURCE}/${EACHDIR} with ${DEST}/${EACHDIR}”
      timex /usr/local/bin/rsync -au ${SOURCE}/${EACHDIR}/* ${DEST}/${EACHDIR}
  done
  }

#Code section
  if [[ -z $1 ]];then
    echo “No Source or Destination specified”
    echo “Usage: migrate.sh /<source_fs> /<destination_fs>”
    exit
  fi
  if [[ -z $2 ]];then
    echo “No Destination specified”
    echo “Usage: migrate.sh /source_fs> /<destination_fs>”
    exit
  fi

#Source and Destination filesystems have been specified
  echo “Source filesystem: $SOURCE”
  FOLDERCOUNT=`ls -l $SOURCE | grep ^d | wc -l | sed -e ‘s/^[ \t]*//’`
  echo “The $FOLDERCOUNT source folders are…”
  ls -l $SOURCE | grep ^d | awk {‘print $9’}
  echo
  echo “Destination filesystem: $DEST”
  echo
  echo -n “Please confirm the details are correct [Yes/No] > “
  read CONFIRM
    case $CONFIRM in
        [Yy] | [Yy][Ee][Ss])
          migratenonhiddenfolders
          ;;

       *)
        echo
        echo “User aborted.”
        exit
       ;;
    esac

#Clean exit
exit

Improved version (with logging) shown below.

#!/usr/bin/bash

#Generic script for migrating file systems.
#Variables Section
  SOURCE=$1
  DEST=$2

#Functions section
  function migratenonhiddenfolders(){

    echo “Migrating ${SOURCE} to ${DEST} at `date`” >> ~/migration.log
    echo “Re-Synchronising non-hidden top level folders only…” | tee -a ~/migration.log
    #Synchronise the data
    ls -l $SOURCE | grep ^d | awk {‘print $9’} | while read EACHDIR; do
    echo “Syncing ${SOURCE}/${EACHDIR} with ${DEST}/${EACHDIR} at `date`” | tee -a ~/${DEST}_${EACHDIR}.log ~/${DEST}.log ~/migration.log
    timex /usr/local/bin/rsync -au ${SOURCE}/${EACHDIR}/* ${DEST}/${EACHDIR} | tee -a ~/${DEST}_${EACHDIR}.log ~/${DEST}.log ~/migration.log
    echo “Completed migrating to ${DEST}/${EACHDIR} at `date`” | tee -a ~/${DEST}_${EACHDIR}.log ~/${DEST}.log ~/migration.log
    done
  }

#Code section
  if [[ -z $1 ]];then
    echo “No Source or Destination specified”
    echo “Usage: migrate.sh /<source_fs> /<destination_fs>”
    exit
  fi
  if [[ -z $2 ]];then
    echo “No Destination specified”
    echo “Usage: migrate.sh /source_fs> /<destination_fs>”
    exit
  fi

#Source and Destination filesystems have been specified
  echo “Source filesystem: $SOURCE”
  FOLDERCOUNT=`ls -l $SOURCE | grep ^d | wc -l | sed -e ‘s/^[ \t]*//’`
  echo “The $FOLDERCOUNT source folders are…”
  ls -l $SOURCE | grep ^d | awk {‘print $9’}
  echo
  echo “Destination filesystem: $DEST”
  echo
  echo -n “Please confirm the details are correct [Yes/No] > “
  read CONFIRM
  case $CONFIRM in
    [Yy] | [Yy][Ee][Ss])
      migratenonhiddenfolders
     ;;
  *)
      echo
      echo “User aborted.”
      exit
      ;;
  esac

#Clean exit
  exit

###########################################################
##
## Data Migration script by M.D.Bradley, Cyberfella Ltd
## http://www.cyberfella.co.uk/2013/08/09/data-migration/
##
## Version 1.0 9th August 2013
###########################################################

Did you like this?
Tip cyberfella with Cryptocurrency

Donate Bitcoin to cyberfella

Scan to Donate Bitcoin to cyberfella
Scan the QR code or copy the address below into your wallet to send some bitcoin:

Donate Bitcoin Cash to cyberfella

Scan to Donate Bitcoin Cash to cyberfella
Scan the QR code or copy the address below into your wallet to send bitcoin:

Donate Ethereum to cyberfella

Scan to Donate Ethereum to cyberfella
Scan the QR code or copy the address below into your wallet to send some Ether:

Donate Litecoin to cyberfella

Scan to Donate Litecoin to cyberfella
Scan the QR code or copy the address below into your wallet to send some Litecoin:

Donate Monero to cyberfella

Scan to Donate Monero to cyberfella
Scan the QR code or copy the address below into your wallet to send some Monero:

Donate ZCash to cyberfella

Scan to Donate ZCash to cyberfella
Scan the QR code or copy the address below into your wallet to send some ZCash:

Translate text from lowercase to uppercase

When comparing files on Linux, there are a bunch of tools available to you, which are covered in separate posts on my blog.  This neat trick deserves its own post though -namely converting between upper and lowercase.

Before comparing two text files that have been sorted, duplicates removed with uniq and grepped etc, remember to convert to lower or upper case prior to making final comparison with another file.

tr ‘[:lower:]’ ‘[:upper:]’ <input-file > output-file

My preferred way to compare files isn’t using diff or comm but to use grep…  More often than not it gives me the result I want.

grep -Fxv -f first-file second-file

This returns lines in the second file that are not in the first file.

When comparing files, remember to remove any BLANK LINES.


Did you like this?
Tip cyberfella with Cryptocurrency

Donate Bitcoin to cyberfella

Scan to Donate Bitcoin to cyberfella
Scan the QR code or copy the address below into your wallet to send some bitcoin:

Donate Bitcoin Cash to cyberfella

Scan to Donate Bitcoin Cash to cyberfella
Scan the QR code or copy the address below into your wallet to send bitcoin:

Donate Ethereum to cyberfella

Scan to Donate Ethereum to cyberfella
Scan the QR code or copy the address below into your wallet to send some Ether:

Donate Litecoin to cyberfella

Scan to Donate Litecoin to cyberfella
Scan the QR code or copy the address below into your wallet to send some Litecoin:

Donate Monero to cyberfella

Scan to Donate Monero to cyberfella
Scan the QR code or copy the address below into your wallet to send some Monero:

Donate ZCash to cyberfella

Scan to Donate ZCash to cyberfella
Scan the QR code or copy the address below into your wallet to send some ZCash:

Comparing two lists in Linux/UNIX

Deserves its own blog post this one.  A new favourite of mine, that seems more reliable than using diff or comm on account of its being easy to understand, and thus less likely to get wrong (matter of opinion).

grep -Fxv -f masterlist backupclients which would list any lines in a list of backupclients that were not found in the master list.

Note:  This lists any lines in the second file that are not matched in the first file (not the other way around).

-F pattern to match is a list of fixed strings

-x select only matches that match the whole line

-v reverses it, i.e. does not match the whole line

-f list of strings to (not) match are in this file

Result: filename output entire lines from the file specified that are not in the file specified by –f


It can be useful to convert all text to UPPERCASE and don’t forget to REMOVE EMPTY LINES in files.

Text can be converted to uppercase with tr ‘[:lower:] [:upper:]’ <infile >outfile

If you want to list only the lines that appear in two files, then comm -12 firstfile secondfile works well.

Did you like this?
Tip cyberfella with Cryptocurrency

Donate Bitcoin to cyberfella

Scan to Donate Bitcoin to cyberfella
Scan the QR code or copy the address below into your wallet to send some bitcoin:

Donate Bitcoin Cash to cyberfella

Scan to Donate Bitcoin Cash to cyberfella
Scan the QR code or copy the address below into your wallet to send bitcoin:

Donate Ethereum to cyberfella

Scan to Donate Ethereum to cyberfella
Scan the QR code or copy the address below into your wallet to send some Ether:

Donate Litecoin to cyberfella

Scan to Donate Litecoin to cyberfella
Scan the QR code or copy the address below into your wallet to send some Litecoin:

Donate Monero to cyberfella

Scan to Donate Monero to cyberfella
Scan the QR code or copy the address below into your wallet to send some Monero:

Donate ZCash to cyberfella

Scan to Donate ZCash to cyberfella
Scan the QR code or copy the address below into your wallet to send some ZCash: