Migrating home directories to VNX

Installation and Configuration

The emc CelerraCIFSManagement snap-in for Microsoft Management Console can be used to set up VNX Home Directory.  It’s a nightmare to find unless you still have your CD’s that came with your Celerra/VNX but see my previous post on CAVA for a possible working link to it, assuming you already have a powerlink account with emc (free to set up).

emc Home Directory is a very neat piece of functionality whereby you change the users home directory path in AD to read \\cifsserver\home and upon hitting the home share on cifsserver the user will be automatically dropped into the subfolder containing their home directory files.  If a home directory folder doesn’t already exist, it can (and will by default) create one.

You don’t need to create a home share on the VNX upfront, and if you do, HomeDirectory won’t actually start.  You will need a filesystem though.  You start the homedirectory feature from the CelerraCIFSManagement snap in, but remember to do a custom install and untick UNIX Users and CAVA if you have no intention of using them, since Unix Users will attempt to change your AD schema (but will fail if you’re account is not a schema admins member).  You can always add the other features later by re-installing and HomeDirectory will not be affected.

Once the snap in is installed, you can enable Home Directory.  It’ll warn that theres currently no database and that one should be created.  Once this is created, all you need to do is create a rule for users * with a path to your filesystem\<d>\<u> whereby <d> is the domain name they’ve logged in on and <u> is their username.  This is what controls what folder they get dropped off at and/or the folder structure that needs to be created for them if there’s no pre-existing home directory for that user.

The default security is that the users home directory is fully secured so that only they can get to it.  This can be changed by setting domain admins full control on a top level folder for the domain, and making a registry change to the emc Home Directory settings in HKLM\Software\emc\homedirectory and setting 0 to 1 which turns on inheritance.

The full official doc can be read here  HomeDirectory , but that is the basic gist of it, and I found it worked first time, so it’s pretty straightforward to get installed and running and makes subsequent adminstration of home directories a cinch.

Migrating users Home Directories

You can view my previous post on using robocopy or emcopy to migrate data.  Note that since existing home directories are each individually shared in their own right, you may feel the desire to use sharedup to migrate the shares to the VNX – This is not required since each user maps the same share and the datamover paths them through to their own subfolder.  You may want to set up an adminstrative hidden share on the root of the filesystem though, so that you can get to ALL the home directories for the purpose of deleting old users, dealing with any support problems.

There is another issue which will affect your ability to migrate users home dirs (possibly) and that is that Windows 7 et al, tend to display a users home directory as “My Documents” occasionally.  This is due to the desktop.ini file misbehaving and can easily be fixed by simply deleting it without consequence.  Obviously desktop.ini would need to be deleted for all users, and this can be done using this example forfiles script.


forfiles /p x:\homedirs /s /m desktop.ini /c “cmd /c attrib -h -s @path”

forfiles /p x:\homedirs /s /m desktop.ini /c “cmd /c del @path”

Or alternatively, exclude desktop.ini from your robocopy or emcopy using /XF desktop.ini in the command line, e.g.

emcopy \\sourcesvr\homedirs\username \\destsvr\homedirs\username *.* /s /nosec /o /a /i /d /c /xf desktop.ini /th 32 /r:5 /w:3

robocopy \\sourcesvr\homedirs\username \\destsvr\homedirs\username *.* /e /fft /np /xf desktop.ini /r:5 /w:3

If a migrated user logs on and is directed to a non-existent home directory hosted on VNX using VNX HomeDirectory, then one will automatically be created and the permissions automatically secured so that only that user can access it*

*default behaviour assuming registry flag on cifs server is still set to 0 and the rule in cifsmanagement snapin home directory settings is set to autocreate

For all other users being directed by homedirectory to their migrated home directories, the security will be inherited from the root of the filesystem*

*assuming the root has everyone full control, or has specific perms set and the registry flag for home directory on the cifs server is set to 1 to inherit all the way to the users home directory

To subsequently secure migrated home directories, we need to list each home directory and then set the permissions for the user on each one*

*assuming the home directory has the same name as the user – probable scenario given the emc HomeDirectory rules use of the <u> variable to represent the users username when creating their homedirectory.

The following command has been used successfully to add a specific Access Control Entry to the permissions on the users home directory, allowing them Full Control.

for /f %f IN (‘dir /ad /b X:\homedirs\’) DO cacls X:\homedirs\%f /e /p %f:F

Note that to execute this command in a batch file, you need to replace %f with %%f

If your filesystem fills up and you want to move, say all users beginning with u6 to a separate filesystem, then the following command is a working example.  robocopy doesn’t allow you do only copy folders matching a wildcard pattern (although it does allow you to copy all folders, excluding certain patterns).

for /f “delims=” %f IN (‘dir u:\u6* /ad /b’) DO robocopy u:\%f j:\%f /MIR /R:1 /W:1 /B /TIMFIX

Update: 28/2/2017  Real World Example: Two passes, two different approaches.  One does inital copy of just usernames beginning with u5, the second generates a list of missing users after the first pass and does a second pass targeting the missing users.

for /f “delims=” %%f IN (‘dir s:\root\u5* /ad /b/ o’) DO robocopy s:\root\%%f t:\root\%%f /COPYALL /R:1 /W:1 /B /TIMFIX /NP /FFT /LOG+d:\mattb\u5mig.log (does first pass on all u5 users)

dir /ad /b /o s:\root\u5* | tr ‘[:upper:]’ ‘[:lower:]’ | tee t:\src.txt | wc –l      (counts 2113 and writes list of all u5 users to src.txt)

dir /ad/b /o t:\root\u5* | tr ‘[:upper:]’ ‘[:lower:]’ | tee t:\dest.txt | wc –l    (counts 2113 and writes list of all u5 users to dest.txt)

comm -23 t:\src.txt t:\dest.txt | tee t:\missing.txt | wc –l  (counts 0 differences and writes list of any missing u5 users to missing.txt)

for /f “delims=” %%f IN (cat t:\missing.txt) DO robocopy s:\root\%%f t:\root\%%f /COPYALL /R:1 /W:1 /B /TIMFIX /NP /FFT /LOG+d:\mattb\u5mig.log (does 2nd pass on any missing users only)

Note: Use /TIMFIX with /B to correct non-copying of datestamps on files, resulting in 02/01/1980 datestamps on all files copied with /B Backup rights.

Did you like this?
Tip cyberfella with Cryptocurrency

Donate Bitcoin to cyberfella

Scan to Donate Bitcoin to cyberfella
Scan the QR code or copy the address below into your wallet to send some bitcoin:

Donate Bitcoin Cash to cyberfella

Scan to Donate Bitcoin Cash to cyberfella
Scan the QR code or copy the address below into your wallet to send bitcoin:

Donate Ethereum to cyberfella

Scan to Donate Ethereum to cyberfella
Scan the QR code or copy the address below into your wallet to send some Ether:

Donate Litecoin to cyberfella

Scan to Donate Litecoin to cyberfella
Scan the QR code or copy the address below into your wallet to send some Litecoin:

Donate Monero to cyberfella

Scan to Donate Monero to cyberfella
Scan the QR code or copy the address below into your wallet to send some Monero:

Donate ZCash to cyberfella

Scan to Donate ZCash to cyberfella
Scan the QR code or copy the address below into your wallet to send some ZCash:

Recursively delete zero-byte files (WIndows)

A common problem with data migration at the file level is that you can end up with users complaining of zero-length files.  The problems come when you re-run the copy in the hope that the zero-byte files in the destination folder structure are updated with healthy ones from the source.  Since the zero-byte files will have a newer time stamp than the source data, they become impossible to “fix” without potentially affecting surrounding files.

The best solution I’ve found is to identify and delete any files that are zero-bytes in length before re-running another copy.

To recursively delete zero-byte files in your folder structure, use the following command

for /r %F in (*) do if %~zF==0 del “%F”

If you wish to include the command in a batch file, you’ll need to double up on the % characters,

for /r %%F in (*) do if %%~zF==0 del “%%F”

This will remove the zero-byte files, allowing you to subsequently re-copy the now missing files from the source

robocopy.exe “%source%” “%dest%” *.* /S /XO /FFT /MT:10

Note: to set your source and destination paths in a batch file, use the following syntax

SET “source=R:\MOVED\Mydata”
SET “dest=T:\Mydata”

To simply find zero-byte files and append their full pathnames to a logfile, use

for /r %F in (*) do if %~zF==0 echo “%F” > e:\logs\zerobytefiles.log

Did you like this?
Tip cyberfella with Cryptocurrency

Donate Bitcoin to cyberfella

Scan to Donate Bitcoin to cyberfella
Scan the QR code or copy the address below into your wallet to send some bitcoin:

Donate Bitcoin Cash to cyberfella

Scan to Donate Bitcoin Cash to cyberfella
Scan the QR code or copy the address below into your wallet to send bitcoin:

Donate Ethereum to cyberfella

Scan to Donate Ethereum to cyberfella
Scan the QR code or copy the address below into your wallet to send some Ether:

Donate Litecoin to cyberfella

Scan to Donate Litecoin to cyberfella
Scan the QR code or copy the address below into your wallet to send some Litecoin:

Donate Monero to cyberfella

Scan to Donate Monero to cyberfella
Scan the QR code or copy the address below into your wallet to send some Monero:

Donate ZCash to cyberfella

Scan to Donate ZCash to cyberfella
Scan the QR code or copy the address below into your wallet to send some ZCash:

Data Migration using robocopy

As a compliment to my recent post “Data Migration using emcopy”

http://www.cyberfella.co.uk/2014/05/02/emcopy/

I thought it only fair to follow up with an equivalent post for good ol’ robocopy.  This has mainly come about having discovered an annoying bug in emcopy whereby it doesn’t ignore the directories specified by more than one /xd exclusion – it always excludes the last one specified, but none of the others?!

Robocopy on the other hand, does allow exclusion of more than one directory, each one specified using the /xd switch and can be a full path (to exclude very specific directories) or just one word (to exclude any directories with that name anywhere in the directory tree).

The switch worth mentioning the most though, is the /FFT switch.  Update:  AND THE /B SWITCH (use backup rights). Uh, and come to think of it, the /XO switch too (especially if you’re running a repeated backup of data to a USB HDD).

Note: Use /TIMFIX with /B to correct non-copying of datestamps on files, resulting in 02/01/1980 datestamps on all files copied with /B Backup rights.

When migrating data into a Celerra/VNX/NetApp CIFS Server, the act of copying data from a NTFS volume on a Windows Server to a Linux based Filesystem on a NAS is enough to throw the timestamps on the files out just enough to make robocopy think that the source file is newer, even when it’s not.  This means that subsequent copies of the changed files take just as long as the initial copy.

By appending /FFT to the long list of switches used in your robocopy command, it allows for a discrepancy of up to 2 seconds – enough to provide a convenient workaround to this problem.

In practice, this brought down troublesome 36 hour copy operations requiring a weekend cut-over to be arranged, down to just over 1 hour – cue cliche  – saving time and money.

An example command is given below…

robocopy d:\source e:\dest *.* /xd “System Volume Information” d:\Migration homedirs profiles wtsprofiles /e /np /fft /xo /r:1 /w:1

There are many more switches available in robocopy, including the ability to use multiple threads in newer versions (highly recommended).  Just type robocopy /? from the Windows command line to see the other options.

In practice I found emcopy to be inconsistent with copying ACE’s across to large filesystems, completely skipping some folders when creating an empty folder structure using the /xf * /create method.  This means that file data (and the missing subfolders) subsequently copied into place with /nosec would be forced to inherit the parent permissions.  Most likely not a problem, but if the data has lots of bespoke permissions then it becomes a huge problem as data is generally more “open” at the parent levels.

To re-sync permissions, the following command was useful.

for /f “delims=” %%f IN (‘dir g:\root\ /ad /b’) DO robocopy /E /Copy:S /IS /IT q:\%%f g:\root\%%f

This has since been updated.  To re-sync folder perms between source and dest trees, this works…

robocopy s:\ d:\ /lev:3 /MIR /SEC /SECFIX /V /B /TIMFIX /xo /xn /xc /r:1 /w:1

Due to folders being missed, I never deal with a file system using a single command.  I always break it up and handle each top level folder as an individual job by placing the command in a for loop as shown above.

Alternatively use the following to replicate changed files and their security, and also set the security on unchanged files.  The /V shows the unchanged files being fixed.

for /f “delims=” %%f IN (‘dir g:\root\ /ad /b’) DO robocopy q:\ g:\root\ /MIR /SEC /SECFIX /V /B /TIMFIX /r:1 /w:1

I found myself fighting for a day or two with an apparent intermittent problem copying NTFS security when robocopying data from NAS to NAS.  Despite using all the methods described above, sometimes the NTFS permissions just weren’t being copied across.  I have since discovered that using the /B switch with every other method mentioned already, fixes this annoying problem and the ACE’s come across perfectly.

I’ve since encountered odd behaviour using for loops that has resulted in a mistrust of them.  So, I code each top level folder as an individual line in a batch file.  The problems were encountered where there were spaces in the folder names irrespective of using “delims=”, robocopy didn’t always get it right thereafter.

Robocopy doesn’t let you copy certain folders.  It lets you exclude certain folders but that’s not much use if you only want to copy folders starting with u6* for example.  In this situation, e.g. migrating all users whose usernames begin with u6 to a separate filesystem, you need to use the for loop.

for /f “delims=” %f IN (‘dir s:\root\u5* /ad /b’) DO robocopy s:\root\%f t:\root\%f /COPYALL /R:1 /W:1 /ZB /NP /L /FFT /LOG+:D:\cyberfellaltd\u6mig.log

Update: 28/2/2017  Real World Example: Migration of a subset of users to new filesystem.  Two passes, two different approaches.  One does initial copy of just usernames beginning with u5, the second generates a list of missing users after the first pass and does a second pass targeting the missing users.  Note that this is a hybrid Bash/Batch script and requires the installation of GNUWin32 on Windows in order to work.  This is covered here.

for /f “delims=” %%f IN (‘dir s:\root\u5* /ad /b/ o’) DO robocopy s:\root\%%f t:\root\%%f /COPYALL /R:1 /W:1 /ZB /NP /FFT /LOG+d:\mattb\u5mig.log (does first pass on all u5 users)

dir /ad /b /o s:\root\u5* | tr ‘[:upper:]’ ‘[:lower:]’ | tee t:\src.txt | wc –l      (counts 2113 and writes list of all u5 users to src.txt)

dir /ad/b /o t:\root\u5* | tr ‘[:upper:]’ ‘[:lower:]’ | tee t:\dest.txt | wc –l    (counts 2113 and writes list of all u5 users to dest.txt)

comm -23 t:\src.txt t:\dest.txt | tee t:\missing.txt | wc –l  (counts 0 differences and writes list of any missing u5 users to missing.txt)

for /f “delims=” %%f IN (cat t:\missing.txt) DO robocopy s:\root\%%f t:\root\%%f /COPYALL /R:1 /W:1 /ZB /NP /FFT /LOG+d:\mattb\u5mig.log (does 2nd pass on any missing users only)

If you have folders containing ampersand characters in the name, your copies can fail.  This post here covers a way to deal with it using variables.

Did you like this?
Tip cyberfella with Cryptocurrency

Donate Bitcoin to cyberfella

Scan to Donate Bitcoin to cyberfella
Scan the QR code or copy the address below into your wallet to send some bitcoin:

Donate Bitcoin Cash to cyberfella

Scan to Donate Bitcoin Cash to cyberfella
Scan the QR code or copy the address below into your wallet to send bitcoin:

Donate Ethereum to cyberfella

Scan to Donate Ethereum to cyberfella
Scan the QR code or copy the address below into your wallet to send some Ether:

Donate Litecoin to cyberfella

Scan to Donate Litecoin to cyberfella
Scan the QR code or copy the address below into your wallet to send some Litecoin:

Donate Monero to cyberfella

Scan to Donate Monero to cyberfella
Scan the QR code or copy the address below into your wallet to send some Monero:

Donate ZCash to cyberfella

Scan to Donate ZCash to cyberfella
Scan the QR code or copy the address below into your wallet to send some ZCash:

Data Migration using emcopy

emc’s emcopy (part of emc’s rather elusive but freely downloadable if you can find it CIFS_Tools.zip package) is akin to Microsoft’s own robocopy, only faster with extra benefits.  The command syntax is much like robocopy so if you’re familar with that, then using emcopy will be easy.


emcopy lets you copy a file or directory (and included subdirectories) from and to an
NTFS partition, keeping security the same on the copy as on the original.
It allows you to back up the file and directory security—ACLs, owner information,
and audit information—from a source directory to a destination directory without copying
the file data.  It defaults to 64 threads but can be told to use up to 256 threads, massively speeding up copy operations.

In practice, emcopy vs robocopy – I have found it to be much faster than robocopy.

Download it from here…

https://download.emc.com/downloads/DL32449_CIFS_Tools.zip.zip

Official documentation here…

https://mydocs.emc.com/VNXDocs/CIFS_Environment_Utilities.pdf

Working examples of emcopy commands below, with differences highlighted.

emcopy_v4.14.exe “S:\My Source Folder” D:\My_Dest_Folder *.*  /s /secfix /o /a /i /d /c /th 32 /r:5 /w:3

emcopy_1


emcopy_v4.14.exe “S:\My Source Folder” D:\My_Dest_Folder *.* /s /nosec /o /a /i /d /c /th 256 /r:5 /w:3

emcopy_2


A more elaborate example showing how to exclude multiple directories specified by full path or just as a name

emcopy_v4.14.exe “S:\My Source Folder” D:\My_Dest_Folder *.* /xd “System Volume Information” homedirs profiles wtsprofiles /s /secfix /o /a /i /d /c /th 32 /r:5 /w:3

I personally prefer to deal with each top level folder as a separate emcopy run, using a for loop as follows…

I have found issues using for loops with robocopy that may similarly affect emcopy whereby top level folders containing spaces still prove problematic despite the use of “delims=” in the for loop.

for /f “delims=” %%f in (‘dir S:\ /ad /b’) DO emcopy.exe “s:\%%f” “d:\%%f” *.* /nosec /a /o /s /i /de /c /th 16 /r:1 /w:1

You may want to create the top level of folders first before adopting this technique to perform the subsequent folder structure creation and or file copy…

for /f “delims=” %%f in (‘dir S:\ /ad /b) DO emcopy.exe “s:\” “d:\root\” /s /xf * /create /r:1 /w:1

Note I omitted the use of /secfix as in practice I found not using /secfix has less problems than using it.  It appears to force re-inheritance from parents which can create as many problems as it promises to fix.

emcopy is just one of a handful of adjacent tools in the CIFS_Tools.zip pack, lgcopy can be used to migrate local groups from Windows to a CIFS Server so that emcopy’s /secfix switch can do it’s thing and there are other useful tools such as sharedup for copying CIFS shares from one NAS to another.  More detailed information is available in the emc documentation.

It’s worth reading this post too…

http://www.cyberfella.co.uk/2014/05/22/data-migration-using-robocopy/

…especially if you want to exclude more than one folder, or are experiencing issues with timestamps when migrating to a NAS.

Copying an empty directory structure using emcopy

If you need to copy just the folder structure, but leave the old security behind, then this command works a treat.

emcopy s: d: /s /xf * /nosec /create

If you want to create a duplicate folder structure including ACL’s for subsequent re-ACL’ing using SetACL, leave out /nosec but don’t use /secfix.

emcopy s: d: /s /xf * /create /r:1 /w:1  

This is useful as part of a data migration to a new domain, where the security exported using SystemTools DumpACL can then be tweaked and reapplied to the new empty directory structure using icacls, prior to an emcopy of the data including files without security afterward.

icacls “C:\CYBERFELLA_LTD\PermsTestACLFolder” /grant “CYBERFELLALTD\GlobalGroup1”:(OI)RX

If you need to re-sync folder security between source and destination data, then robocopy can be used to achieve this.  See here

[paypal-donation]

Did you like this?
Tip cyberfella with Cryptocurrency

Donate Bitcoin to cyberfella

Scan to Donate Bitcoin to cyberfella
Scan the QR code or copy the address below into your wallet to send some bitcoin:

Donate Bitcoin Cash to cyberfella

Scan to Donate Bitcoin Cash to cyberfella
Scan the QR code or copy the address below into your wallet to send bitcoin:

Donate Ethereum to cyberfella

Scan to Donate Ethereum to cyberfella
Scan the QR code or copy the address below into your wallet to send some Ether:

Donate Litecoin to cyberfella

Scan to Donate Litecoin to cyberfella
Scan the QR code or copy the address below into your wallet to send some Litecoin:

Donate Monero to cyberfella

Scan to Donate Monero to cyberfella
Scan the QR code or copy the address below into your wallet to send some Monero:

Donate ZCash to cyberfella

Scan to Donate ZCash to cyberfella
Scan the QR code or copy the address below into your wallet to send some ZCash:

Anti-virus on VNX CIFS Servers

To scan viruses on your Windows File Servers using local or block (SAN) storage is easy – you just install an AV agent on the Windows Server and voila.  But what if your Windows File Server is replaced by an emc VNX CIFS Server?

The VNX uses an optional agent called CAVA (Common Anti-virus Agent) that enables a filter driver on the CIFS Server that sends  the file off to a third party AV server for scanning.  If a virus signature is found, the VNX subsequently deletes the file.

Here’s everything you need to set it up…   (Note that versions described below may change over time).

emc CAVA for VNX Installation, Configuration and Administration

Create a Windows Server, preferably 2 or a couple of VMs and add to the domain.

Download VNX Common Event Enabler from here (291MB)…

You’ll need to register an account on support.emc.com if you don’t already have one (Powerlink account).

https://download.emc.com/downloads/DL48037_Common-Event-Enabler-6.3.1-for-Windows.iso

Install VNX Common Event Event Enabler 6.3.1 (includes CAVA) and a 3rd party AV product of your choice.
emc_VEE_Pack_x64_6.3.1.exe

You will also need to install <vnx nas version>_VNXFileCifsMgmt.exe which sadly is only available on CD2 of the Tools Pack that came with your VNX.  If you’ve subsequently upgraded the NAS to a more recent version, you’ll need to obtain the latest software from EMC.  I was able to download the elusive software from a link sent to me by EMC support, even though I couldn’t find it or search for it on Powerlink.  The links below may work for you, it may not.  Try it.

https://support.emc.com/search/?text=”cifs%20tools”&facetResource=ST

or try this one…

https://support.emc.com/search/?text=Dl48750%20DL32448

Start, Administrative Tools, Celerra Management,
Expand Data Mover Management (you’ll need to point it at the IP address of your CIFS interface)
Expand Anti-virus
Set file masks (don’t use *.*), and exclude files that don’t harbor viruses, configure CAVA CIFS Server name to exactly match that on the VNX CIFS Server name (may need to be in caps!), and IP addresses of CAVA AV Servers.  Example viruschecker.conf shown below.  How you get this into your viruschecker.conf is your problem.  Personally, I’d take the easy option of using the gui, then manually edit the viruschecker.conf file using vi to fix any problems, remove square brackets and stuff.  To edit the viruschecker.conf file manually on the datamover over ssh, log on as nasadmin, su to root and use these commands…

server_file server_2 -get viruschecker.conf viruschecker.conf

vi viruschecker.conf (and tidy it up)

server_file server_2 -put viruschecker.conf viruschecker.conf

CIFSserver=globalcifsserver  -Note that this CIFS Server must reside on physical DM, not your CIFS Server on VDM
Addr=<IP addresses of AV engines separated by semi colons> eg 10.1.1.1:10.1.1.2
shutdown=viruschecking

excl=*.dwl:*.edb:*.fmb:*.fmt:*.fmx:*.frm:*.inp:*.ldb:*.ldf:*.mad:*.maf:*.mam:*.maq:*.mar:*.mat:*.mda:*.mdb:*.mde:*.mdf:*.mdn:*.mdw:*.mdz:*.ndf:*.ora:*.orc:*.ost:*.pst:*.sc:*.sqc:*.sql:*.sqr:*.stm:*.tar:*.tmp:*.zip:????????:*RECYCLER*

masks=*.386:*.ace:*.acm:*.acv:*.acx:*.add:*.ade:*.adp:*.adt:*.app:*.asd:*.asp:*.asx:*.avb:*.ax:*.ax?:*.bas:*.bat:*.bin:*.bo?:*.btm:*.cbt:*.cdr:*.cer:*.cfm:*.chm:*.cla:*.class:*.cmd:*.cnv:*.com:*.cpl:*.cpy:*.crt:*.csc:*.csh:*.css:*.dat:*.dbx:*.der:*.dev:*.dl?:*.dll:*.do?:*.do??:*.doc:*.docx:*.dot:*.drv:*.dvb:*.dwg:*.eml:*.exe:*.fon:*.fxp:*.gadget:*.gms:*.gvb:*.hlp:*.hta:*.htm:*.html:*.htt:*.htw:*.htx:*.im?:*.inf:*.ini:*.ins:*.ins:*.isp:*.its:*.js:*.js?:*.jse:*.jtd:*.lgp:*.lib:*.lnk:*.lnk:*.mad:*.maf:*.mag:*.mam:*.maq:*.mar:*.mas:*.mat:*.mau:*.mav:*.maw:*.mb?:*.mda:*.mdb:*.mde:*.mdt:*.mdw:*.mdz:*.mht:*.mhtm:*.mhtml:*.mod:*.mp?:*.mpd:*.mpp:*.mpt:*.mrc:*.ms?:*.msc:*.msg:*.msh:*.msh1:*.ksh:*.msh1xml:*.msh2:*.msh2xml:*.mshxml:*.msi:*.mso:*.msp:*.mst:*.nch:*.nws:*.obd:*.obj:*.obz:*.ocx:*.oft:*.olb:*.ole:*.ops:*.otm:*.ov?:*.pcd:*.pcd:*.pci:*.pdb:*.pdf:*.pdr:*.php:*.pif:*.pl:*.plg:*.pm:*.pnf:*.pnp:*.pot:*.pot:*.pp?:*.pp??:*.ppa:*.pps:*.pps:*.ppt:*.prc:*.prf:*.prg:*.ps1:*.ps1xml:*.ps2:*.ps2xml:*.psc2:*.pwz:*.qlb:*.qpw:*.reg:*.rtf:*.sbf:*.scf:*.sco:*.scr:*.sct:*.sh:*.shb:*.shs:*.sht:*.shtml:*.shw:*.sis:*.smm:*.swf:*.sys:*.td0:*.tlb:*.tmp:*.tsk:*.tsp:*.tt6:*.url:*.vb:*.vb?:*.vba:*.vbe:*.vbs:*.vbx:*.vom:*.vs?:*.vsd:*.vsmacros:*.vss:*.vst:*.vsw:*.vwp:*.vxd:*.vxe:*.wbk:*.wbt:*.wiz:*.wk?:*.wml:*.wms:*.wpc:*.wpd:*.ws:*.ws?:*.wsc:*.wsf:*.wsh:*.xl?:*.xl??:*.xla:*.xls:*.xlt:*.xlw:*.xml:*.xnk:*.xtp

Create a service account in the domain and check the user rights

Create a local group viruscheckers on the CIFS Server using the local users and groups snap-in, and add your service account in.

Make your service account a local admin on the CAVA Servers and double check that the debug programs right in group policy has local administrators in it (windows default setting) or put the cava service account in it.  This is needed for the CAVA service to query the OS on the VM to determine the AV engine.

GPO_name\Computer Configuration\Windows Settings\Security Settings\Local Policies\User Rights Assignment        Debug Programs

Restart the EMC CAVA service on the CAVA Vm’s using this service account – note: it’ll get assigned Log On As A Service rights automatically.

If you need to re-add rights to the CAVA service account in group policy for any reason (they’ve been stripped out in an update), then you’ll need to also restart the CAVA Service on the VM before the CAVA Agent on the Datamover will re-recognise the AV engine.

In the EMC Celerra Management snap-in

Expand User Rights Assignment
Expand EMC Virus Check
Add
Select the service account in the Domain to give virus checking right to, Add, OK, OK

PuTTY/SSH to VNX Control Station
Login as nasadmin
server_viruschk server_2
You should see ONLINE, plus details of file masks and AV server used.

If you get Unknown AV Engine or Third Party AV engine, even though you’re using McAfee or Sophos or one of the other supported AV engines, then something is up – HP Protect Tools can get in the way of the DM authenticating to the CAVA VM’s.  I’m using McAfee and although mcshield.exe is a known av engine and its running, it didn’t pick it up because the password was getting scrambled by ProtectTools.  Check your AV policy being applied to the AV engine includes Network Drives.  It may not.  Until you solve this problem, set shutdown=viruschecking in your viruschecker.conf to shutdown=no to prevent it from stopping all the time.  Use the snap-in to adjust this setting.  Also make sure your viruschecker.conf is pointing as a global cifs server permanently resident on the physical datamover and not your cifs server on a virtual data mover thats actually sharing your filesystems.

server_viruschk server_2 -audit
Should see details of viruses caught. This can be tested using EICAR test virus and dropping the file into the CIFS Share on the CIFS Server.
The file should get automatically deleted by your anti-virus software.

Reboot everything once it’s all set up (CAVA Vm’s).  A reboot can cure most problems.

Common Commands via the CLI

Replace server_x with the data mover you are accessing eg server_2

server_viruschk server_x Shows if virus checking is running and scanning rules
server_viruschk server_x -audit Shows CAVA scanning stats and scan queue. Very useful to see if the CAVA queue is blocked
server_log server_x To see if there are any errors on the data movers
server_setup server_x –P viruschk –o start=64 Start the virus checker service on the data mover
server_setup server_x –P viruschk –o stop Stop the virus checker service on the data mover
server_viruschk server_x –fsscan fs1 –create Starts a virus scanning job a on file system
server_viruschk server_x –fsscan fs1 –delete Stops a virus scanning job on a file system
server_viruschk server_x –fsscan fs1 –list Show the scanning status

Debugging CAVA

You can set debug logging on the data mover

.server_config server_2 “param viruschk Traces=0x00000004” #turns on debug for AV in the server_log
.server_config server_2 “param viruschk Traces=0x00000000” #turns off debug for AV in the server_log

server_log server_x To see if there are any errors logged on the data movers.

[paypal-donation]

Did you like this?
Tip cyberfella with Cryptocurrency

Donate Bitcoin to cyberfella

Scan to Donate Bitcoin to cyberfella
Scan the QR code or copy the address below into your wallet to send some bitcoin:

Donate Bitcoin Cash to cyberfella

Scan to Donate Bitcoin Cash to cyberfella
Scan the QR code or copy the address below into your wallet to send bitcoin:

Donate Ethereum to cyberfella

Scan to Donate Ethereum to cyberfella
Scan the QR code or copy the address below into your wallet to send some Ether:

Donate Litecoin to cyberfella

Scan to Donate Litecoin to cyberfella
Scan the QR code or copy the address below into your wallet to send some Litecoin:

Donate Monero to cyberfella

Scan to Donate Monero to cyberfella
Scan the QR code or copy the address below into your wallet to send some Monero:

Donate ZCash to cyberfella

Scan to Donate ZCash to cyberfella
Scan the QR code or copy the address below into your wallet to send some ZCash:

Windows Server 2012 VM won’t boot

Having reluctantly agreed to spending £260 of company funds on a Microsoft Action Pack subscription, I thought I might as well familiarise myself with Windows Server 2012 and Windows 8.  What more convenient way than to use Oracle Virtualbox on my Ubuntu powered Dell XPS 13?  sudo apt-get install virtualbox took care of installing that.

I created a new VM and pointed the virtual optical device at the Windows 8 .img file (that I had to rename to .iso) and it booted and installed fine, and was ready for use in literally a few moments which I found impressive (I shall delve deeper into the OS later and try to appreciate its merits rather than look to criticize its faults)

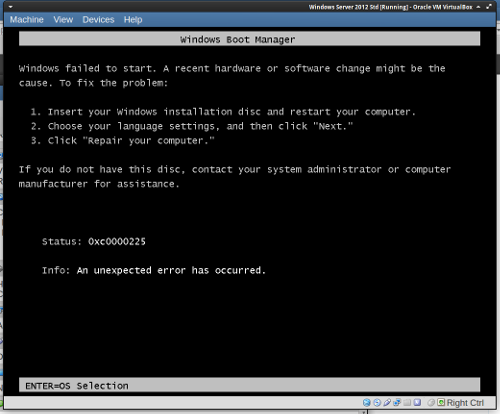
Windows 2012 Server however did not, throwing its toys in the air at the first opportunity with a cryptic oxc0000225 error.

WindowsServer2012VMcrash


This is easily fixed by powering the VM off, and ticking the Enable IO APIC setting.

WindowsServer2012VMboot


Once this is enabled, the VM can boot fine and you’re soon prompted to “Install now”.  The installation wizard is almost identical to that of Windows 8, and completes just as rapidly.

WindowsServer2012VM

Did you like this?
Tip cyberfella with Cryptocurrency

Donate Bitcoin to cyberfella

Scan to Donate Bitcoin to cyberfella
Scan the QR code or copy the address below into your wallet to send some bitcoin:

Donate Bitcoin Cash to cyberfella

Scan to Donate Bitcoin Cash to cyberfella
Scan the QR code or copy the address below into your wallet to send bitcoin:

Donate Ethereum to cyberfella

Scan to Donate Ethereum to cyberfella
Scan the QR code or copy the address below into your wallet to send some Ether:

Donate Litecoin to cyberfella

Scan to Donate Litecoin to cyberfella
Scan the QR code or copy the address below into your wallet to send some Litecoin:

Donate Monero to cyberfella

Scan to Donate Monero to cyberfella
Scan the QR code or copy the address below into your wallet to send some Monero:

Donate ZCash to cyberfella

Scan to Donate ZCash to cyberfella
Scan the QR code or copy the address below into your wallet to send some ZCash:

Exchange Management Shell

Some useful client-side commands to run in the Exchange Management Shell on the MBX (Mailbox Server) when diagnosing failed Exchange backups in emc Networker or other product (due to VSS Writer issues) and examples of the expected output.

Get-MailboxDatabase GB-DAG* -Status | select Server,name,LastFullBackup

Server Name LastFullBackup
—— —- ————–
Server1 DAG1-MDB01 23/05/2013 14:10:32
Server1 DAG1-MDB07 28/05/2013 00:06:25

Get-MailboxDatabase GB-DAG* -Status | select Server,name,LastIncrementalBackup

Server Name LastIncrementalBackup
—— —- ———————
Server1 MDB01 04/07/2013 19:44:04
Server1 MDB07 04/07/2013 19:44:04

Get-MailboxDatabase GB* -status | sort-object name | ft name, server, lastf*, lasti*, backupinprogress -auto

Name                        Server                              LastFullBackup              LastIncrementalBackup BackupInProgress
—- —— ————– ——————— —————-
MDB01 Server1 02/07/2013 14:45:11 04/07/2013 19:44:04    False
MDB02 Server1 02/07/2013 14:38:56 04/07/2013 19:42:35     False

Get-MailboxDatabase -Identity GB-DAG1* -Status | sort-object name| ft server,name,backupinprogress -auto

Server Name BackupInProgress
—— —- —————-
Server1-MBX001 DAG1-MDB01 False
Server2-MBX002 DAG1-MDB02 True

Get-MailboxDatabase GB* -status | sort-object name | ft name, server, activationpreference, lastf* -auto

Name Server ActivationPreference LastFullBackup
—- —— ——————– ————–
DAG1-MDB01 Server1-MBX001 {[Server1-MBX001, 1], [Server2-MBX001, 2]} 23/05/2013 14:10:32
DAG1-MDB02 Server2-MBX002 {[Server2-MBX002, 1], [Server1-MBX002, 2]} 28/05/2013 00:06:26

Get-MailboxDatabaseCopyStatus “*\GB*” | sort-object name

DAG1-MDB01\Server2-MBX001 Healthy 0 2 30/05/2013 07:50:56 Healthy
DAG1-MDB01\Server1-MBX001 Mounted 0 0 Healthy

vssadmin list writers
vssadmin 1.1 – Volume Shadow Copy Service administrative command-line tool
(C) Copyright 2001-2005 Microsoft Corp.

Writer name: ‘Task Scheduler Writer’
Writer Id: {d61d61c8-d73a-4eee-8cdd-f6f9786b7124}
Writer Instance Id: {1bddd48e-5052-49db-9b07-b96f96727e6b}
State: [1] Stable
Last error: No error

Writer name: ‘VSS Metadata Store Writer’
Writer Id: {75dfb225-e2e4-4d39-9ac9-ffaff65ddf06}
Writer Instance Id: {088e7a7d-09a8-4cc6-a609-ad90e75ddc93}
State: [1] Stable
Last error: No error


See the active/passive status of each mailbox database how Networker will see it prior to backing it up (or ignoring it if it’s active and passive option is set)

nsrsnap_vss_save -v -?

To reset databases that have backups “In Progress” and reset any “Restartable errors” on VSS Writers, restart the Microsoft Exchange Replication Service on all servers in the DAG.

Did you like this?
Tip cyberfella with Cryptocurrency

Donate Bitcoin to cyberfella

Scan to Donate Bitcoin to cyberfella
Scan the QR code or copy the address below into your wallet to send some bitcoin:

Donate Bitcoin Cash to cyberfella

Scan to Donate Bitcoin Cash to cyberfella
Scan the QR code or copy the address below into your wallet to send bitcoin:

Donate Ethereum to cyberfella

Scan to Donate Ethereum to cyberfella
Scan the QR code or copy the address below into your wallet to send some Ether:

Donate Litecoin to cyberfella

Scan to Donate Litecoin to cyberfella
Scan the QR code or copy the address below into your wallet to send some Litecoin:

Donate Monero to cyberfella

Scan to Donate Monero to cyberfella
Scan the QR code or copy the address below into your wallet to send some Monero:

Donate ZCash to cyberfella

Scan to Donate ZCash to cyberfella
Scan the QR code or copy the address below into your wallet to send some ZCash:

Subnet mask quick reference

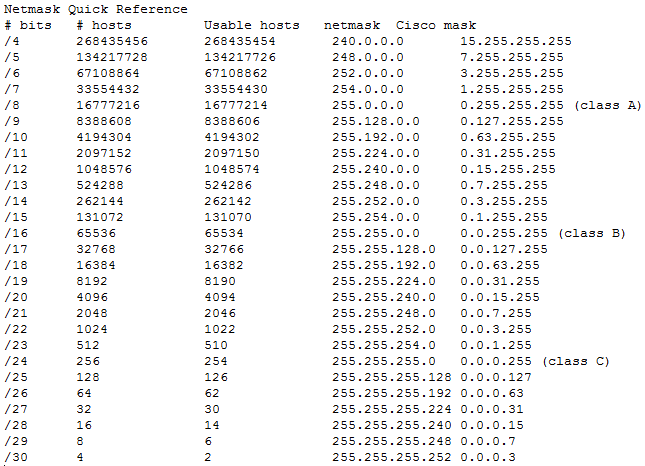
A quick and convenient reference for netmask values.

netmasks

Did you like this?
Tip cyberfella with Cryptocurrency

Donate Bitcoin to cyberfella

Scan to Donate Bitcoin to cyberfella
Scan the QR code or copy the address below into your wallet to send some bitcoin:

Donate Bitcoin Cash to cyberfella

Scan to Donate Bitcoin Cash to cyberfella
Scan the QR code or copy the address below into your wallet to send bitcoin:

Donate Ethereum to cyberfella

Scan to Donate Ethereum to cyberfella
Scan the QR code or copy the address below into your wallet to send some Ether:

Donate Litecoin to cyberfella

Scan to Donate Litecoin to cyberfella
Scan the QR code or copy the address below into your wallet to send some Litecoin:

Donate Monero to cyberfella

Scan to Donate Monero to cyberfella
Scan the QR code or copy the address below into your wallet to send some Monero:

Donate ZCash to cyberfella

Scan to Donate ZCash to cyberfella
Scan the QR code or copy the address below into your wallet to send some ZCash:

Adding a persistent static route

Whether your Windows server or Linux server has multiple NICs to connect it to multiple VLANs and/or networks, sometimes you’ll need to configure a static route so that your server knows which interface to use in order to get to the syslog server, ntp server etc if it is to use a route other than the default gateway.

Solaris

vi /etc/gateways    (if this file doesn’t exist read on…)

Underneath>>    net 192.168.0.1 gateway 192.168.0.254 metric 1 passive

Add the following>>       net 10.0.0.0 gateway 10.8.2.65 metric 1 active

Note:  The default gateway is set in the /etc/defaultrouter file

If the /etc/gateways file doesn’t exist, then static routes may have been added “the old way”

cd /etc/rc2.d

ls | grep static

You may see a startup file called Snnnstatic_routes.  Inside this script will be non-persistent static routes added using lines that read something like /usr/sbin/route add 10.0.0.0/24 10.8.2.65 1   Append your routes to the ‘start’ section, not forgetting to add a corresponding route delete command in the ‘stop’ section.

Red Hat Linux

echo ‘10.0.0.0/24 via 10.8.2.65’ >> /etc/sysconfig/network-scripts/route-eth0

service network restart

route -n to view the current routing table

Windows

route -p ADD 10.0.0.0 MASK 255.255.255.0 10.8.2.65

netstat -rn to view the routing table

Excellent examples here: http://www.thegeekstuff.com/2012/04/route-examples/

Did you like this?
Tip cyberfella with Cryptocurrency

Donate Bitcoin to cyberfella

Scan to Donate Bitcoin to cyberfella
Scan the QR code or copy the address below into your wallet to send some bitcoin:

Donate Bitcoin Cash to cyberfella

Scan to Donate Bitcoin Cash to cyberfella
Scan the QR code or copy the address below into your wallet to send bitcoin:

Donate Ethereum to cyberfella

Scan to Donate Ethereum to cyberfella
Scan the QR code or copy the address below into your wallet to send some Ether:

Donate Litecoin to cyberfella

Scan to Donate Litecoin to cyberfella
Scan the QR code or copy the address below into your wallet to send some Litecoin:

Donate Monero to cyberfella

Scan to Donate Monero to cyberfella
Scan the QR code or copy the address below into your wallet to send some Monero:

Donate ZCash to cyberfella

Scan to Donate ZCash to cyberfella
Scan the QR code or copy the address below into your wallet to send some ZCash: