
Introduction
This post compliments the Networker Cheat Sheet here that was originally written in 2012 and maintained for a few years before moving on to other things.
This fresh take on checking backups in EMC’s Networker product has been initially generated by ChatGPT 4o and will be maintained manually, going forward.
It compliments the original Cheat Sheet, or rather the Cheat Sheet compliments it, since it contains the finer technical detail surrounding each of the steps described at a high level, below.
Both will continue to be maintained as deemed necessary/valuable.
EMC NetWorker Backup Check Guide
This guide provides a detailed process for an engineer to check and verify EMC NetWorker backups, ensuring data protection and recovery readiness.
Prerequisites
Access and Permissions:
Ensure you have appropriate permissions to access the EMC NetWorker server and relevant systems.
Familiarize yourself with the NetWorker Management Console (NMC) and command-line interface (CLI).
Software Requirements:
EMC NetWorker installed on the server.
EMC NetWorker Management Console (NMC).
Access to client machines if needed.
Documentation:
Backup schedules and policies.
List of critical systems and data to be backed up.
Contact information for the IT team and stakeholders.
Steps to Check EMC NetWorker Backups

1. Verify Backup Schedules and Policies
Ensure that the backup schedules and policies are correctly configured:
Open the NMC and navigate to “Configuration.”
Check “Groups” for correct scheduling.
Review “Policies” and “Workflows” to ensure all critical data is included.
2. Monitor Recent Backup Activities
Using NMC:
Go to the “Monitoring” tab.
Select “Completed Jobs” to see recent backup activities.
Check for any failed or incomplete jobs.
Using CLI:
Open a terminal and use the mminfo command:
mminfo -avot -r "client-name,level,sscomp,totalsize,ssflags" -q "savetime>=24 hours ago"
Open a terminal and use the nsrwatch command:
nsrwatchReview the output from mminfo and the live output in nsrwatch for any errors or issues with Uptime (server uptime), Devices (backup data storage devices), Write Completion (save sets completed, writing, 0 bytes, i.e. hung)
3. Validate Backup Completeness
Check Backup Logs:
In the NMC, navigate to “Monitoring” > “Logs.”
Review logs for errors or warnings related to backup jobs.
Using CLI:
Use the nsrinfo command to validate backup details for a specific client:
nsrinfo <client_name>Confirm that all expected files and directories are listed.
4. Test Backup Recovery
Perform regular test recoveries to ensure data can be restored when needed:
Identify a non-critical system or a test environment for recovery.
In NMC, select “Recover” and follow the wizard to restore data.
Verify the integrity and completeness of the recovered data.
5a. Check Storage Utilization
Ensure there is sufficient storage space for backups:
In NMC, go to “Media” > “Media Management.”
Check the status and available space on storage devices.
Monitor tape or disk usage to prevent overflow.
5b. Check DataDomain Health/Capacity
The following list of commands are useful when checking the health of the DataDomain Storage Devices providing the storage media to the Networker backup servers.
enclosure show summary

net show settings

alerts show current

alerts show history

alerts clear alert-id "<alertID>"

user show list

user enable ddboost

disk show hardware

disk show state

disk fail/unfail

filesys show space
6. Review Alerts and Notifications
Configure and review alerts to stay informed about backup issues:
In NMC, navigate to “Configuration” > “Alerts.”
Set up notifications for backup failures, low storage, and other critical events.
Regularly check email or other configured notification channels.
7. Document and Report Findings
Create a Backup Status Report:
Summarize the status of recent backups.
Highlight any issues, errors, or anomalies.
Document actions taken to resolve issues.
Share with Stakeholders:
Distribute the report to relevant IT staff and management.
Schedule meetings to discuss any significant issues or improvements needed.
8. Perform Regular Maintenance
Update Software:
Ensure EMC NetWorker and any related software are up to date with the latest patches and updates.
Review and Adjust Policies:
Periodically review backup policies to adapt to changes in data volume or criticality.
9. Troubleshooting Common Issues
Failed Backups:
Check logs for specific error messages.
Ensure the client is reachable and has enough resources.
Verify network connectivity between the NetWorker server and clients.
Slow Backup Performance:
Monitor network bandwidth and server performance.
Optimize backup schedules to avoid peak usage times.
Verify that storage devices are functioning correctly.
Storage Space Issues:
Review retention policies to ensure data is not retained longer than necessary.
Add additional storage capacity if needed.
Conclusion
Regular checks and maintenance of EMC NetWorker backups are crucial for ensuring data integrity and availability. By following this guide, you can systematically verify backup schedules, monitor activities, validate backup completeness, test recovery processes, and maintain overall backup health. Always document findings and communicate with stakeholders to ensure transparency and readiness for data recovery.
For detailed command references and advanced troubleshooting, refer to the EMC NetWorker documentation and support resources.
Troubleshooting Non-Running Backups
The following steps help troubleshoot a non-running backup, including those that use the NMM (Networker Module for Microsoft) to perform snapshot backups of Exchange Server, SQL Server, SharePoint and Hyper-V.
In NMC, run the Backup Group containing Client and observe Failure. Check the Log output detail.
Simultaneously, observe nsrwatch and observe behaviour, checking media is online and mounted.
Ensure the FQDNs are present in the Client Config for all network interfaces, i.e. LAN and BU interface/network connections.
Perform ping and nslookup (forward and reverse lookup) tests on the command line for all the fqdns and IPs of the backup client to ensure DNS has all the requisite A and PTR records for Networker to validate the authenticity of the client.
Correct and re-run the backup, observing any new errors in NMC and using nsrwatch.
Re-test the client backup by using the following command to run the Group.
nsradmin -C "type: NSR client; group: Exchange" | moreObserve the errors and mitigate accordingly if obvious.
Error 21
For Error 21, Check the VSS Writers are healthy. Networker NMM Module for Microsoft Applications uses the VSS Writers to perform point-in-time snapshots of the data. If the VSS Shadow Copy Writers are not healthy, Networkers NMM Module cannot do its job.
vssadmin list writersObserve any Services using the VSS Shadow Copy Service that are in an error state and restart those services.
Repeat client backup test using the nsradmin command above.
In the event of continued failure, ensure that the RMAgentPS Service is started (“Replication Manager Client for RMAgentPS“)
In the event that you’re using Client Direct to bypass the Networker Storage Node by sending block data direct to a DataDomain, ensure that the requisite ports are open to allow the communication on both LAN and BU Networks.

Verifying that a Client-Direct backup has taken place
Use the following networker commands to look for flags that indicate client direct backups.
nsrinfo -s <backup_server> -c <client_name>

mminfo -avot -c <client_name> -r "volume,ssid,client,group,pool,level,sscomp,ssflags"
In C:\Program Files\EMC NetWorker\nsr\logs\daemon.raw and nmm.raw, the following entries should be observed if it is running correctly.

Error 500
If an HTTP response code:500 error occurs when attempting to back up a new client, Check the ‘Globals (1 of 2)’ dialog in the client config on the NMC for lower and upper case ALIAS
Firewall Tests
The following commands are useful in troubleshooting firewall issues.
Attempts to connect to the nsrd process
nsradmin -s <backupserver>

Attempts to connect to the nsrexecd process
nsradmin -s <backupserver> -p nsrexecd

Displays listening processes
nsrrpcinfo -p <backupserver>

To display specific listening processes
nsrrpcinfo -t <backupserver> nsrd

To test connectivity to Storage Node
nsrrpcinfo -t <storagenode> nsrsnmd
In a Powershell WIndow, you can test ports are open, e.g. for SQL Server
From backup server: Test-NetConnection -ComputerName <sql-client_name> -Port 1433Client Connectivity Tests (Linux BuR Servers)
The following commands are useful in verifying backup client connectivity. Be aware that for a backup server to backup a client, the client must allow it. This is done by adding the name of the backup server to the local servers files on the backup client:
/nsr/res/servers (linux)
C:\Program Files\EMC Networker\res\servers (Windows)
nsradmin -p 390113 -s client
echo p | nsradmin -p 390113 -i - -s host
Check Networker installed packages
rpm -qa | grep lgto
Check errors with client
nsradmin -C "type: NSR client; group: ACTest" |more
telnet <client> 7937
From backup server: rpcinfo -p "<client>"
From client: rpcinfo -p "<backup_server>"
Client Connectivity Tests (Windows BuR Servers)
From backup server: nsrrpcinfo -p “<client>”
From client: nsrrpcinfo -p “<backup_server>”
In a Powershell WIndow, you can test ports are open, e.g. for SQL Server
From backup server: Test-NetConnection -ComputerName <client_name> -Port 1433NSR Peer Information Reset from Networker Backup Server & Client
This command can be used to reset the peer information on the backup server, effectively starting all communications between the two from a clean point. It can also be run on the backup server to clear out ALL communication between the server and all of its clients.
nsradmin -p nsrexec
print type:nsr peer information; name:client_name
delete
Y
This command can be used to reset the NSR peer information from the client.
nsradmin -p nsrexec
print type:nsr peer information
delete
Y
To reset all communication between the NSR Backup server and all it’s backup clients in one go,
nsradmin -p 390113 -C "NSR peer information"Unable to obtain the user credentials from the lockbox
Perform the step above to delete nsr peer information from the client,
Edit /etc/hosts on the client and add an alias for the backup interface of the backup server, e.g.
10.200.200.10 backupserver01-b backupserver01 Where backupserver01-b is the hostname of the backup server’s backup interface
Log Render
To view the daemon.log in a human-friendly readable format without disrupting operations, use the following command,
nsr_render_log -empathy daemon.raw > daemon.logProbe the backup client
Probe the backup client from the backup server, logging the communication.
savegrp -pvc <client> <group_name>
More verbose logging: savegrp -D9 -pc <client> <group_name>
Check client backup history
Check the health of the backups for a client over a given period in history,
List names of all clients backed up over the last 2 weeks (list all clients)
mminfo -q “savetime>2 weeks ago” -r ‘client’ | sort | uniq

List all backups for a specific client
mminfo -q ‘client=client-name, level=full’ -r ‘client,savetime,ssid,name,totalsize’
Add a user to the admin list on a NSR Backup Server
New Backup administrators will need to be added to the NSR console as an admin user.
nsraddadmin -u user=username, host=*Reset NMC Users password
To reset the password of an NMC user, you will still need to obtain the administrator password. Then you can use this command:
authc_mgmt -u admin -P admin_password -g nmc -op reset-user-password -u usernameStop a scheduled Save/Clone Job (jobquery/jobkill)
Clone jobs can appear running for hours but with 0 bytes written. The first thing to check is that the devices required are mounted using nsrwatch
The following describes how you identify and kill a scheduled clone job that is stuck at 0 bytes. First use jobquery to identify it.
# jobquery
jobquery> show name:; job id:; job state:
jobquery> print type: clone job; job state: SESSION ACTIVE:
                      job id: 64002;
                   job state: SESSION ACTIVE;
                        name: clone.linux clones;
then use jobkill to kill it.
jobkill -j jobID
i.e. jobkill -j 64002
If you run jobkill with no parameters, it enters a more interactive session, listing all jobs. You can identify the clone jobs and kill them without necessarily running jobquery first.
# jobkill
                      job id: 3104018;
                        name: cyberfellasvr-5;
                        type: savegroup job;
                     command: ;
           NW Client name/id: ;
                  start time: 1312763880;
------------------------------------------------------
                      job id: 3104025;
                        name: /d/01;
                        type: save job;cyberfellasvr.lab
                     command:
save -s cyberfellasvr.lab -g nox-5 -LL -f - -m cyberfellasvr.lab -t 1312026303
-l 5 -q -W 78 -N /d/01 /d/01;
           NW Client name/id: cyberfellasvr.lab;
                  start time: 1312763880;
------------------------------------------------------
                      job id: 3104026;
                        name: /;
                        type: save job;
                     command:
save -s cyberfellasvr.lab -g nox-5 -LL -f - -m cyberfellasvr.lab -t 1312026306
-l 5 -q -W 78 -N / /;
           NW Client name/id: cyberfellasvr.lab;
                  start time: 1312763880;
------------------------------------------------------
Specify jobid to kill ('q' to quit, 'r' to refresh): 3104018
Terminating job 3104018
Specify jobid to kill ('q' to quit, 'r' to refresh): q
vProxy Networker VMWare Protection
VM Backups are facilitated by a vProxy appliance. Controlled by the Neworker Server (and configured via NMC), the vProxy appliance backs up .vmdk files direct to the DataDomain.
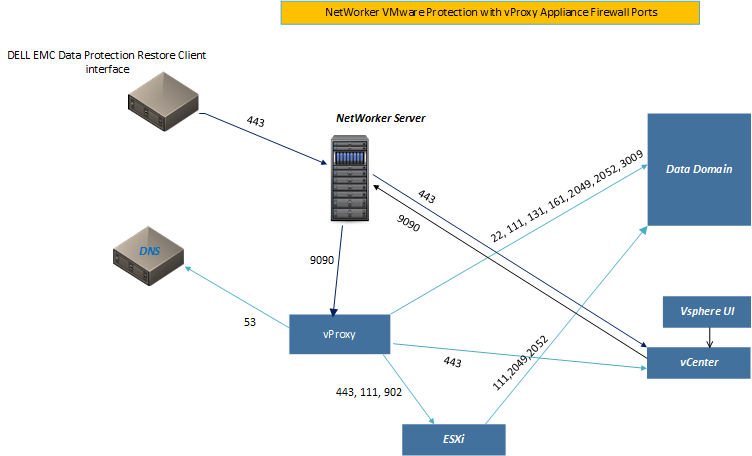
Deployment of a vProxy appliance is covered here
Configuration of vProxy is covered here
Backup of VMs is covered here
Recovery of VMs is covered here
Backup and Recovery of vCenter Server is covered here
Jukeboxes and Tape Drives
If you’re extremely unfortunate, you may find yourself troubleshooting a jukebox with a replacement tape drive, decades after they’ve gone out of vendor support. Good luck with that. Here are some useful Networker nsrjb commands, in any case.
Ensure that any jumpers that control SCSI ID are set accordingly, ideally the same as the previous drive and definitely not the same as any existing drives.
After adding the new drive, open the legacy nwadmin UI and make sure the drive is set to Enable, not in Service Mode.
nsrjb -C            #Identify the jukebox and tape drives present
nsrjb -HEvv         #If the new drive isnt visible, re-initialise the jukebox
nsrjb -v -C         #Verify SCSI ID is assigned and is unique
nsrjb -v -I -S <slot_number>        #Attempt to load a tape from <slot_number>
nsrjb -C            #Verify the drive is Enabled and Ready
nsrjb
nsrjb -u -f <device_name>           #Eject tape from device e.g. /dev/rmt/0cbn
Despite the replacement tape drive looking identical in every way, If the firmware is not compatible then it simply won’t work. Depending on the manufacturer, the following tools can be used to backup and restore firmware to the tape drive. Same goes for the Jukebox.
For IBM Drives, obtain the IBM Tape Diagnostic Tool (ITDT), available for a multitude of operating systems. This post on the Dell KB, goes more in depth on its use.
itdt -f <device_id> firmware --backup #Backs up existing f/w before upgradeFor HP Drives, obtain the HPE Library and Tape Tools (L&TT), also available for a multitude of operating systems including legacy Solaris and OpenVMS systems,
For Quantum drives, obtain Quantum StorageCare Guardian available for Windows, Solaris and Linux.
Disable McAfee AV to speed up NMC loading times
NMC can be slow to load for a variety of reasons, some of which are unavoidable. But you can disable AV to speed it up.
"c:program files (x86)\McAfee\VirusScan Enterprise\mcadmin.exe" /disableoasDisplay all users known to the NMC
To see if your account has been added to the NMC for access, or to obtain the username if you do not know it, you can use this command.
authc_mgmt -u administrator -p <password> -e find-all-usersPermission denied. User does not have Operate Networker or Change Application Settings privilege to perform this operation.
This can happen in a variety of situations, including the dedicated oracle backup account attempting to clear down retired backup savesets in networker.
Use the following command on the backup server to add the user as an admin:
nsraddadmin -u <user>@<server_name>VMWare vProxy Backup Group succeeds but is marked as failed
If VM’s are removed from VMWare the UUID of the VM in Networker is still in the vmware nsrpolicy and so failure messages will still be written to the top of the log when vProxy backups run for the remaining VMs.
These UUIDs require cleaning out to prevent the errors from recurring which marks your otherwise successful backup group with a red X instead of the green tick it deserves.
The following command will remove the UUID from the nsrpolicy.
nsrpolicy group update vmware -g <backup_group> -O <UUID_from_log>Tip cyberfella with Cryptocurrency
Donate Bitcoin to cyberfella

Donate Bitcoin Cash to cyberfella

Donate Ethereum to cyberfella
Donate Litecoin to cyberfella
Donate Monero to cyberfella

Donate ZCash to cyberfella